
One of the most hideous features of our living (aside from that floral carpet!) was the 70s style gas fireplace. It just kills the period features in the room. The cornicing, the panelling around the window; all those gorgeous original features, dominated by one giant ugly fireplace. Luckily, we had the gas to it disconnected back when we did some work in the kitchen a couple of years back (always thinking ahead!) and so now we're renovating the living room, it was finally time for this old thing to get gone. Finally! Thank the lord! 

You'll remember we removed a similar old back boiler fireplace from the dining room a couple of years back, so we now have some experience when it comes to removing these things. By experience what I really mean is, forceful man power. Turns out these things aren't often held in by much and it took a mere 30 seconds to literally wrench the whole thing off the wall. Probably the quickest transformation you ever did see! It was there and then, it was gone.


(Word of caution when you open up old fireplaces - always be aware of the possibility of finding any asbestos board or insulation that could be hidden behind old fireplaces. I've written a whole post about asbestos, which you can read right here. But when it comes to uncovering anything pre 90s it's something you should always be aware of potentially coming across.)
Looking better already I'd say! But of course, we weren't stopping there. We planned on opening up the whole thing in the hope of *one day* (I'm talking years away here!) having a log burner in there. When it comes to opening up an old chimney - you never really know what to expect. There should be a supporting arch to hold the brickwork up above (fingers crossed!), but more often than not, these have usually been removed and replaced for concrete lintels. You may even find neither an arch or a lintel, which is also quite common (this is what we had in the dining room!) due to more lax building regulations in the past. You may find the chimney has been completely blocked off, or you may even find original features in there - like parts of an old fireplace. Basically - it's super exciting because you never know what you might find. The thing I was hoping for the most - was an arch.

A week or so later, we started chopping off the plaster to inspect the brickwork beneath and start opening it all back up. I say *we*, but actually Grant did all the work whilst I took a rest for the day and basically took all the photos ;) He used our trusty SDS drill with a chisel attachment which makes the job a thousand times quicker and easier.. 
We wanted to preserve as much of the original plaster as possible, so we only planned to go as high as we needed to - which would be as high as we could see either an arch, or a lintel. If you have an arch (in good condition) you don't need a lintel. If there's no arch, you'll need a lintel, even if there's one missing! You can check out our chimney opening in the dining room to see how we DIY fitted a concrete lintel there.
Grant chopped off the plaster fairly high and there was no arch or lintel in sight, so I convinced him to climb into the opening to have a look from the inside (after all, we didn't want to chop off all the plaster unnecessarily if there wasn't one). Thankfully, a couple of rows of bricks higher and there was one!


It was everything I had hope to find in the dining room a few years back, that had been destroyed. It was high and beautifully formed, in good condition and I was hella excited about it!
We then had to go about removing the bricks beneath the arch - which needs to be done really really carefully to ensure you don't go destroying the arch. We recommend doing it by hand rather than power tools and just take care to carefully chisel out the mortar, rather than go bashing your way in. The arch after all, is supporting all the bricks above so it needs to be solid and free from movement. So you don't want to be causing any movement with lots of heavy bashing. Take your time and just go about it with some care.


Slowly but surely, starting right underneath the arch we could see it all open up. And it is beaaaautiful!


When Grant got to the 'mini opening' (the bit that had the metal sheet over it) we discovered a rather unusual lintel.... A metal pipe. Yep, a pipe to support those bricks above it. Well I did tell you builders were more lax back in the day didn't I?!


And just like that, we now have one giant arched chimney opening in our living room. Isn't it glorious?! It's made the room feel so much bigger now there isn't a giant gas fireplace sticking out from it. It adds depth to the room, has given the chimney breast a focal point rather than just being a giant box in the room and the sooted up bricks show off the age and character of this building. Needless to say, I love it! 
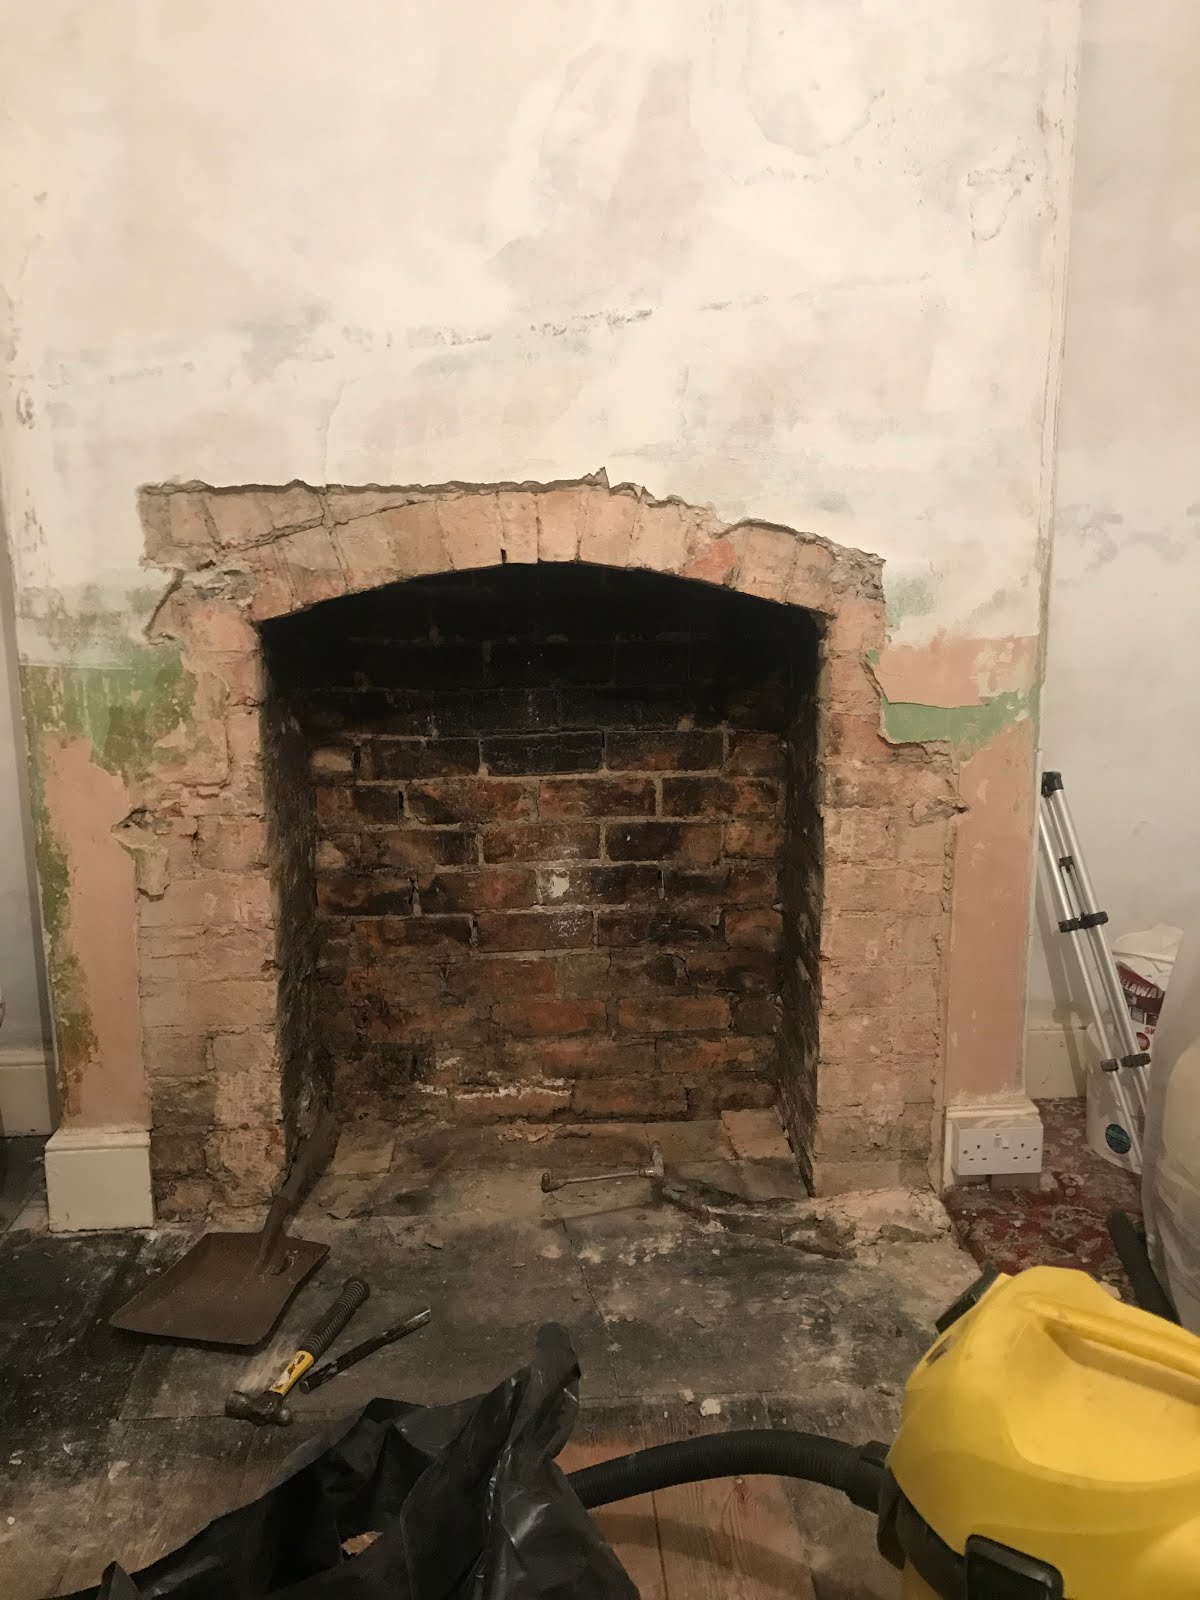

The plan is to keep the brickwork inside the chimney exposed although it will need to be cleaned up a little so the soot isn't constantly staining everything or falling off. But generally speaking, I like it rustic just as it is, imperfect mortar and all. We'll patch-plaster around the opening where we've chopped off too much plaster and we'll also fit a new hearth (plans for that will be revealed soon!) so that it will be log-burner ready for the much distant future. 
So, from 1970s fireplace back to Victorian style in all in a matter of hours. I know which one I prefer! How about you?
from http://www.kezzabeth.co.uk/2018/03/uncovering-victorian-chimney-arch.html
0 Comments
Leave a Reply. |

 RSS Feed
