There's no better home than one that's filled with heaps of natural light. Let's face it, no one really wants to live in something so dark and depressing as a prison cell. Natural light boosts positivity, makes you feel more awake and generally it just has an overall good effect on us. But, homes aren't always built to make the most of natural light. In fact, some homes (cottages and 'chocolate box' style homes in particular) have very very little light.
But you don't have to move in order to get more light into your property - there's some great ways you can add extra light into the home, or bounce existing light around the room to feel more airy and light. So if your home is lacking on natural light, here's some ideas to brighten up your mood and home;
Windows and Sun Tunnels
Well, I had to start with the most obvious didn't I? Nothing brings more light into the home than adding extra windows, particularly south facing ones. It's obviously not a cheap solution, but it may well be a worthwhile one. I always think it's funny when large walls have tiny windows - so expanding a window size may also be an option. Roof Windows are also another solution, especially great for old outdated extensions (like ours!). Doing some of the work yourselves can save heaps of money - as we did, which you can see here. Or if you're feeling particularly brave you could even attempt the whole thing yourself - Roofwindows.co.uk have a great DIY guide for installations and offer very affordable windows too! We're couldn't be more pleased with our new roof window - what was once a very very dark space is now much brighter. The roof window also draws your eye up, so it gives more height to the room too making it feel much bigger AND it's a freaking awesome feature!

If windows are still a stretch too far, sun tunnels are also a great way to bring in some more natural light. They can be fitted into most upstairs rooms (or any room with a roof above), require a lot less work and add a touch more light into a room where a window otherwise isn't an option.
Lighting
Even the lightest and brightest rooms can look miserable and dull with bad lighting. After all, we live in the UK and at least four months of the year has very little/no daylight anyway! So good lighting in a home is vital. Downlights are a great way to brighten up a space. They ensure an even coverage of lighting (unlike a pendant where the lighting gets darker around the edges of the room) and are great as 'task lighting'. It's still good to have some ambient evening lightening though - so do try and add in some table lamps or other feature lighting for a softer cosier light at night.
Add Mirrors
Mirrors are such a great way to bounce natural light around the room. Placing them on an adjacent wall to a window or glazed door not only tricks the eye into almost extending the wall, but they'll also reflect and bounce natural light straight into the room. I also love how mirrors give more angles to appreciate any views or feature furniture from.

Doors with Glazing
Swapping doors for ones with glazing (this could be internal doors or external doors!) is another trick for making natural light go further. If you have a particularly dark hallway for example, a glazed front door will bring heaps more light through. Or, even an internal door into a room off the hallway would do the same job. Glazed doors also make spaces feel much bigger, as they extend what your eye would normally see and they really help inter-connect rooms when doors are shut. Imagine having a garden, with no window to see it - same kind of deal. We've swapped the old door into our conservatory for this exact reason, the room now feels so much more part of the house and the kitchen is much much brighter too!

Wall Colour
I love a dark wall - the inspiration under #styleitdark on instagram is just incredible and makes you want to whip out a paint brush instantly. But sometimes a dark coloured room can just be a step too far for some people - and instead of creating a moody embraced dark room, it can feel dingy and dull instead. Wall colour can make or break a room, and whilst embracing the darkness of a room can create a really cosy atmosphere, if you're after something brighter and lighter, I recommend using light bright and cheerful colours, not necessarily white (which can actually sometime just look dull!). Pops of colour also work great in dark rooms too, so a feature wall may be another idea, or you can bring some 'pops' in with accessories instead. Dulux even have an entire range of "Light and Spacious" colours for smaller or dark rooms. The paint claims to bounce light, much like the mirror idea - surely worth a try?

Furniture
A lot of dark furniture can really oppress a room and take away natural light too. I love dark wood and dark greys, but if you're after a light and bright space, a whole room filled with them can sometimes be a bit too much. Mirrored furniture (or glass topped perhaps!) will have similar advantages to a wall mirror and minimising the amount of furniture will also give more space to take advantage of any light. Less is often more, as they say!
Do you have a dark room in your home you'd like more light in? And do you have any tips to add? I'd love to hear them!
*Collaborative Post
 from http://www.kezzabeth.co.uk/2017/03/ways-to-bring-more-light-into-home.html
0 Comments
With Spring on the horizon, I'm more excited than ever to finally begin transforming the front of our house. The only thing we've changed since moving in over 2 and a half years ago(!!) is removing some grab bars either side of the front door which had been there to assist the elderly previous owner. Other than that, everything remains. Even the internal window blinds! (Yep, all front rooms still yet to be renovated!) Having just recently spent all our pennies on a new kitchen, we don't exactly have oodles of cash to play around with for this project. But it was on the 2017 Renovation list, and we really want the front of our home to be a true representation of the inside - which is a loved, working progress of a home. NOT a forgotten unloved home, as it has so looked up until now! We also hope to host a few parties in our new kitchen over the coming months too and we want our guests to be welcomed through a pretty exterior. (Let's just forget about that ugly dated hallway they'll have to then go through for now though!)
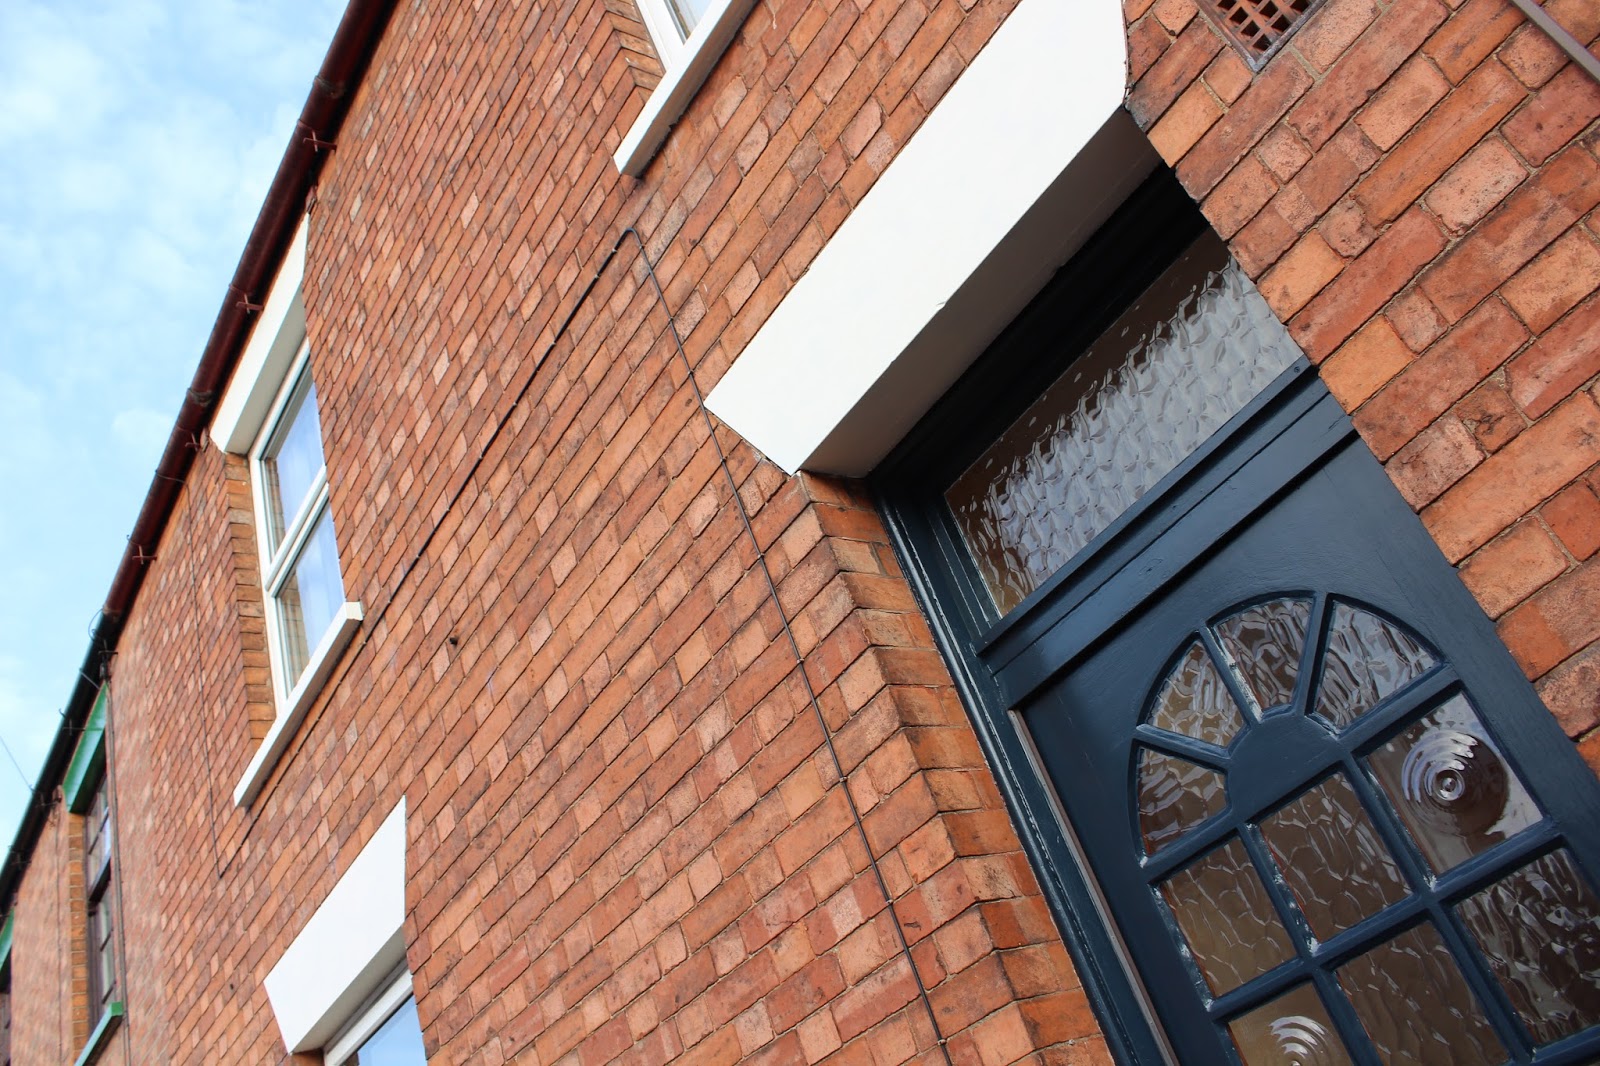
So, instead of a full front-of-house renovation - where I thoroughly intend on having a reclaimed beautiful stained glass door (er - when I win the lottery). Instead, we're going for more of a Spring refresh. A good coat of fresh paint throughout, some added greenery and other smaller DIYs to come in the future to brighten it all up a little. I'll share some of my plans for that at the end, but first - what it looked like pre-makeover... 


I don't think the outside of this house had been painted in YEARS. The salmon-y red colour is actually just sun-bleached red - and lord knows how long it takes for paint to get sun-bleached in the UK?! The door is obviously quite dated in style, although I am thankful it's wood and NOT a cheap horrible uPVC equivalent, but those random circular glass details just makes me feel queasy. We updated the front of our old house with a good lick of paint and new door furniture and it looked (almost!) brand new. So we're hoping to do the same here too. FFX.co.uk an online company for basically all things DIY (including tools, building materials, paint to name a few) very kindly provided the supplies for this project, including some cream masonry paint for the lintels and window sills, a deep midnight blue exterior wood paint for the door, some masking tape and a fresh set of new brushes - we're always in need of some new brushes, and these Draper ones were bloomin' brill, not a single thread of bristle loss!! (Pet hate. Don't you hate that too?!) 


So with supplies in hand and frosty weather passing, I skipped to it and finally began sanding the front door. I used a combination of power sanding (our multi-tool does the job with a sanding attachment!) and just regular hand sandpaper. I found the current paint on the door was like sanding crayons - It was very very waxy and power sanding was just a bit too abrasive and left too many deep scuffs. I was also keen not to over-sand as the paint may well have been lead-based as we don't really know how old it is. So just a little sand was all we went for, making sure to remove any peeling bits around the frame and generally giving it a bit of a scuff-up so the new paint adheres well. 

The current paintwork on the door is quite sloppy as if it'd been painted before masking tape was invented (ha!), because there just isn't a single crisp edge. It had very clearly been free-handed and whomever did it, didn't do a great job. I really didn't want to spend forever scraping the old paint off the glass - and I was quite conscious I may scratch the glass up at the same time, so instead I just masked an area that included a bit of the glass to be painted. This isn't ideal, but it will give us a nice crisp line - and like I say, it's not (hopefully!) the *forever door*. 
And then, on went the paint! We've gone for a deep midnight blue - although I also considered popping pinks, pastels, neon yellow and grungy black. Basically folk, I like colour! But midnight blue took my particular fancy for that hour, and away I went with it. It took three coats to cover up the red, but I bloomin' love it! The colour that is, not the door. It's a satin finish and a really on-trend colour right now! It'll also give the door a fresh coat of added protection against weather, including no more sun-bleaching! 

The lintels and window sills also got a new coat of paint too - in fact, I think it was this part of the front that looked the worse. A sun-bleached door is one thing, but lintels and sills? No thanks. The condition of our window sills aren't great - some of them are cracked and the bottom window was quite badly peeling too. So, I decided to scrape the many layers of paint off with the help of a heat gun. (I'd usually use Peel Away, but with our house being on the road, I could envision some pesky investigating child touching it and their parents suing me for chemical burns, so yeah - I stayed clear of that!) 
I couldn't quite get all of it off, but after a quick sand, it felt smooth enough to then paint onto. I haven't bothered to strip the upstairs sills, purely because you'll never really see them, so it kind-of seemed like a waste of time. The paint we're going for on these, is a matt cream colour. Again, I was torn between cream and grey on this - but cream was a little more safe and hopefully more 'fresh' looking too. Here's a few snaps, including me up the ladder - it was a ridiculously cold day (despite the deceptive blue skies and sunshine!) hence the giant hoody and multiple socks get-up ;) 


The cream is much lighter than I thought it would be and is more of an off-white. I am however very glad it's not a darker cream - I'm not a great fan of orange/beige variations of cream! I do however think it looks far more sophisticated now, a lot fresher, modern, and the home looks loved again, albeit it with some ugly blinds. The off-white cream and dark door combo definitely works well, although I'm still not loving that actual door. But I'm am super glad I took the time to strip the bottom window sill, it's the crispest one on the street! 


We do intend on replacing the door handle and letterbox in the near future too - I'm thinking brass would look good against the blue (opinions gratefully received!) but as I say, our budget for this is limited at the moment, so that'll be something to come in a month or two. We'd also like to add some more potted plants to the front, in a very European kind of fashion. (Basically a whole row of pots) And most importantly, a climber and trellis for some pretty flowers to stretch their way up the house. Some window boxes (perhaps faux ones) are also on the list and I have a great idea for a DIY house-number I'd like to create too. Oh and maybe add some lighting as well. Basically, still lots to do! But for now, we're loving this new look! What do you reckon? Do you have any front-of-house updates planned for this Spring? *Materials kindly provided by FFX. All thoughts, opinions and reviews are my own. Thank you for supporting the brands who support this blog! :) from http://www.kezzabeth.co.uk/2017/03/front-of-house-spring-makeover.html
An energy efficient historic window is a very real and very attainable thing that can be accomplished by minimal upgrades to the original window that cost far less than replacement. “Every single historical wood and steel window can be repaired and made to be as or more energy efficient than a replacement window.”
You see, the reason this one gets me so riled up is because windows are by far the most endangered pieces of historic buildings. They are being torn out and thrown away in the name of energy efficiency at a rate of over 3o million a year. Not only is their removal and disposal a huge strain on our landfills, it is completely unnecessary. Here’s why: Marketing, Lobbying, & Dirty TricksThe replacement window industry has done extensive testing and knows the facts about their products. They know that the windows they are selling are engineered with obsolescence in mind. They can market them as energy saving because initially they save energy over a neglected, un-weatherstripped original window even though cradle to grave they use way more energy. In fairness almost anything would save lots of energy compared to a beat up neglected old window (even an $8 sheet of plywood would!) so it’s not a high bar to beat. What they won’t tell you is that a restored and weatherstripped window will save more net energy than a new replacement window. Here’s how the replacement window industry’s game works: They Show You Your ProblemThey convince you you have a problem: The problem is two fold, your old window is drafty and inefficient, your old window requires maintenance. That appeals to the two most powerful marketing triggers to all humans, time and money. They Solve Your ProblemThey offer you a single product (a window) that solves both of these problems! Cut your energy bills and never have to maintain that window again. Amazing right? Wrong. The WarrantyThey promise you their product has a “liftetime warranty” which it does, but only on “non-glass materials”. They don’t tell you about the 10 or 20-yr warranty on the glass. That is buried in the fine print which only dorks like me dig up and share with smart readers like you. A warranty is only as good as the weakest link and their lifetime warranties don’t stand up to scrutiny because they are technically only 10 to 20-yr warranties due to the fact that if the glass fails then the only solution is to replace the whole unit. Maybe at this point you’re thinking “Hey even 20 years is not a bad warranty.” They aren’t done with their dirty little tricks yet! That 20-yr warranty only covers materials NOT labor after only 2 years! Here’s a little excerpt from Pella’s Warranty on vinyl windows. “If Pella is given notice of a glass defect occurring within twenty (20) years of the date of sale by Pella or its authorized dealer, Pella shall, at its sole option: 1) repair or replace the defective glass (with cost of labor included only within two [2] years of the date of sale by Pella or its authorized dealer)” You want a little more naked truth about their “lifetime warranty” on “non-glass materials” keep reading! The US Census Bureau reports that Americans move approximately 12 times in their lifetime. If the average lifespan is 79 years (which it is in 2017) then that means on average we move every 6 1/2 years. What does that have to do with the “lifetime warranty” though? Well, to use Pella again, that “lifetime warranty” is non-transferrable. That means that as soon as you move those windows are no longer warrantied and ripe for full price replacement as soon as they fail. Pella isn’t stupid. They know these figures and while they will honor a lifetime warranty on vinyl windows for the handful of people who live in their house for 20+ years they know that most of their “lifetime warranties” will only have to be serviced for about 6 1/2 years. And anyone can make a window that can last that long. And it’s not just Pella, it’s all the major window manufacturers who play this game. You can read more in my post Replacement Windows: The Real Story. But let’s get back to the question at hand. Are Historic Windows Energy Efficient?For the answer you don’t need to listen to my opinions or the marketing hype from the replacement window industry. You need cold hard facts not salespeople so here they are. In 2011 the Window Preservation Standards Collaborative, a group of window restorers from all over the country, got together for their first summit to discuss this very topic. They had a hunch that historic windows were more efficient than the replacement industry was saying but no one had ever done definitive unbiased testing. The testing was performed by a third party certified by the Building Performance Institute according to ASTM E1186-03 (2009) standards and the findings were astonishing! There were 5 different levels of efficiency upgrades tested and all of them exceeded to 2009 IECC energy requirements for windows. More than that, all but one exceeded the current 2012 IECC energy code requirements! All of these windows were built in the 1930s and were single paned double-hung windows. The results are below:
If you’re not a believer in numbers and facts then there is very little I can do for you, but this round of testing was the final nail in the coffin for replacements windows in my opinion. This shows that historic windows are indeed energy efficient. Not to mention that you don’t have to worry about 10, 20, or even 30-yr warranties with historic windows. They have already lasted 80, 100, 120+ years and they will continue to last another century with minimal care. If you want to learn everything thing from the basic to advanced techniques for repairing, restoring, and weatherstripping historic windows you can visit my resource page How To: Repair Old Wood Windows. The post Are Historic Windows Energy Efficient? appeared first on The Craftsman Blog. from https://thecraftsmanblog.com/are-historic-windows-energy-efficient/
Well, this week I start to put my money where my mouth is and prove my points so you can finally have some real answers about historic preservation. If I can’t give you crystal clear answers about historic preservation then I doubt it can get any simpler. The info here is clear, concise, and easily shareable for the social media age we live in. Today I’ll be diving into the first of my four claims about historic preservation: Historic preservation is GOOD for property values and spurs sustainable local economic growth
Is preservation good for property values? If your mayor, city councilman, or anybody else has been working hard to scare your town from adding historic districts to their purview because they “hurt” property values then they are either ignorant of the facts or purposely misleading you. More often than not it is developers and special interests who have bent their weak wills to hide from the truth. The answer is plain and simple. The idea that historic designation (whether by district or individual structure) hurts property values is an outright LIE! There is no way from any data other than the ones taken from La-La Land that any respectable economist, developer, or politician can back up this fallacy. Just ask them to provide their evidence and their case will fold like a house of cards. The Facts About Historic Preservation and Property ValuesI wrote about this before in The Real Economics of Preservation, but in case that wasn’t enough to convince you I’ve accumulated a whole new set of studies here. And so you don’t think these are isolated studies I have accumulated a wide swath of states from around the country. In any state in America that has done similar studies the results have been about the same as what is listed below. Do a simple Google search for your state and it shouldn’t take you long to find the same that I have accumulated. Below are quotes and references for just six of the scores of studies determining historic preservation’s effect on property values. Texas 2001
Results suggest that historic preservation generally has a positive impact on property values and that historic designation is associated with average property value increases ranging between 5% and 20% of the total property value. Source
New York 2003
IBO found clear evidence that after controlling for property and neighborhood characteristics, market values of properties in historic districts were higher than those outside historic districts for every year in our study. Source
Florida 2010
Historic designation does not itself depress property values, and indeed properties located in a recognized historic district generally maintained their value during the period 2006-2009 better than did other comparable non-historic properties (or did not lose as much value). Source
Kentucky 2008
The 26% difference in property value increases between designated historic preservation districts and neighborhoods without historic district status translates into a 4.3% additional increase per year for historic preservation areas. Source
Michigan 2002
In the five Michigan case studies, the district samples had a greater increase in their total appreciation than the non-designated comparisons. These differences in appreciation ranged widely, from extremely dramatic to fairly slight. These results suggest that local historic designation has had either a positive effect, or an effect that is consistent with the total appreciation of the surrounding area. These findings do not support the contention that local historic designation negatively impacts property values. Source
Washington 2006
The results of this analysis suggest that the property values in the two study neighborhoods with relatively large numbers of sales, the Eldridge Avenue Historic District (Bellingham) and North Slope Historic District (Tacoma), have appreciated at slightly faster rates than values in the two comparison neighborhoods and, in the case of Eldridge Avenue, faster than property values in the city of Bellingham as a whole. Source
There are hundreds of these studies with new ones coming out every year showing the same exact thing, historic preservation is good for property values. In fact, in years of research I have only found one very specific case where property values were conclusively harmed by historic designation and that was in Manhattan. The conclusions of the study were clear that there was a decrease in value and the conclusion was that due to the rare situation of actual land value (the dirt the building sits upon) being astronomically higher than anywhere else in the country the properties did not appreciate as much because developers who would normally build dozens of stories high were forbidden due to the districting. So, New York City is, as always, an anomaly when it comes to real estate. I’ll be back next week to post on my second point about why preservation is a positive influence on American culture. Till then I look forward to hearing your feedback on the facts I provided above. It will take all of us to change the perception so please share this on your social media and start those conversations. And for those who are more visually oriented I’ve made this infographic to help convince those preservation deniers without the time to read.
The post Is Preservation Good For Property Values? appeared first on The Craftsman Blog. from https://thecraftsmanblog.com/is-preservation-good-for-property-values/ 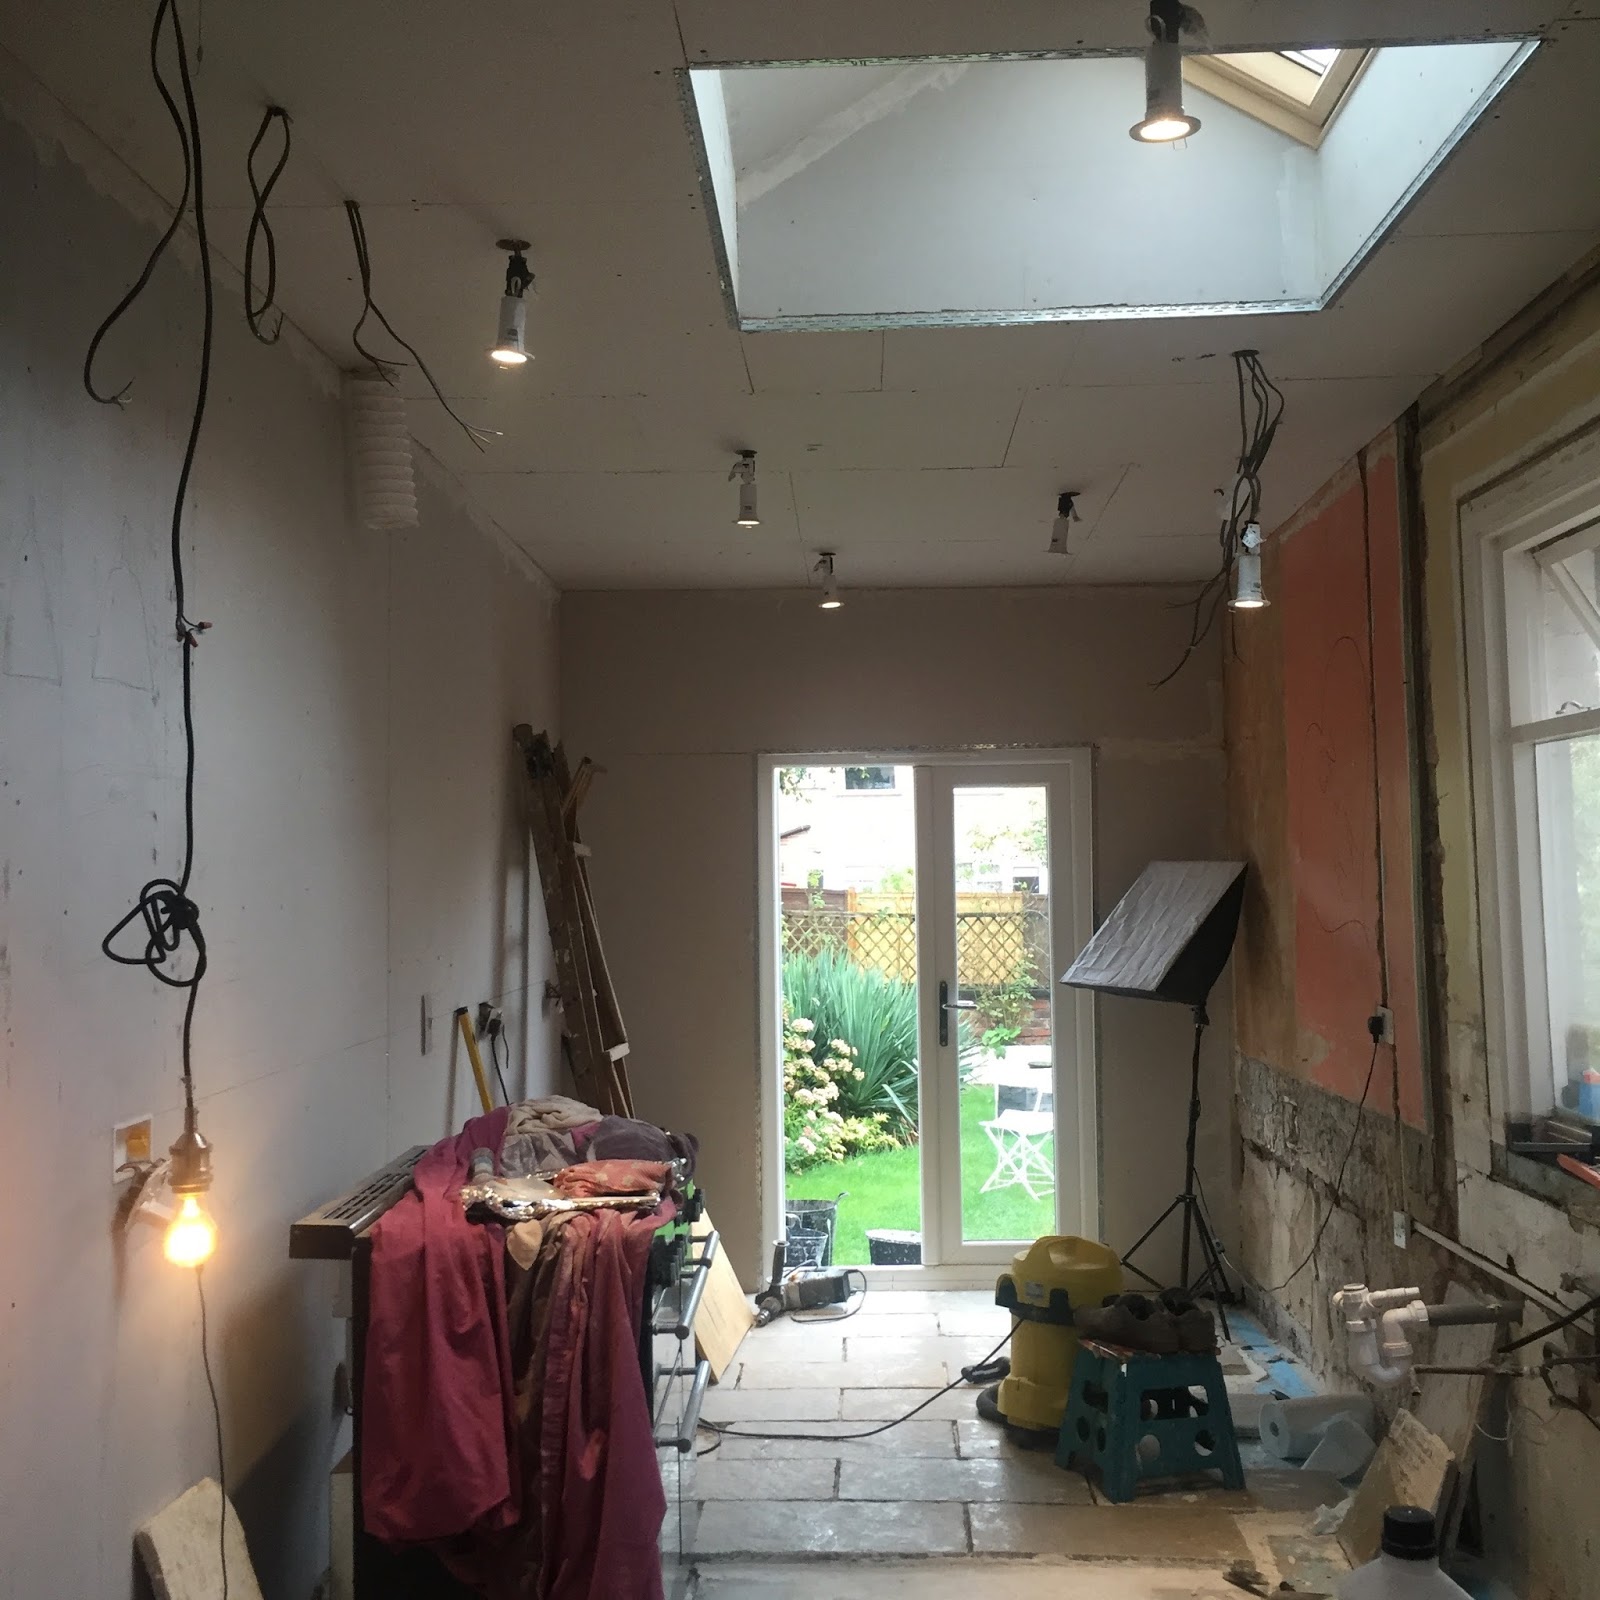
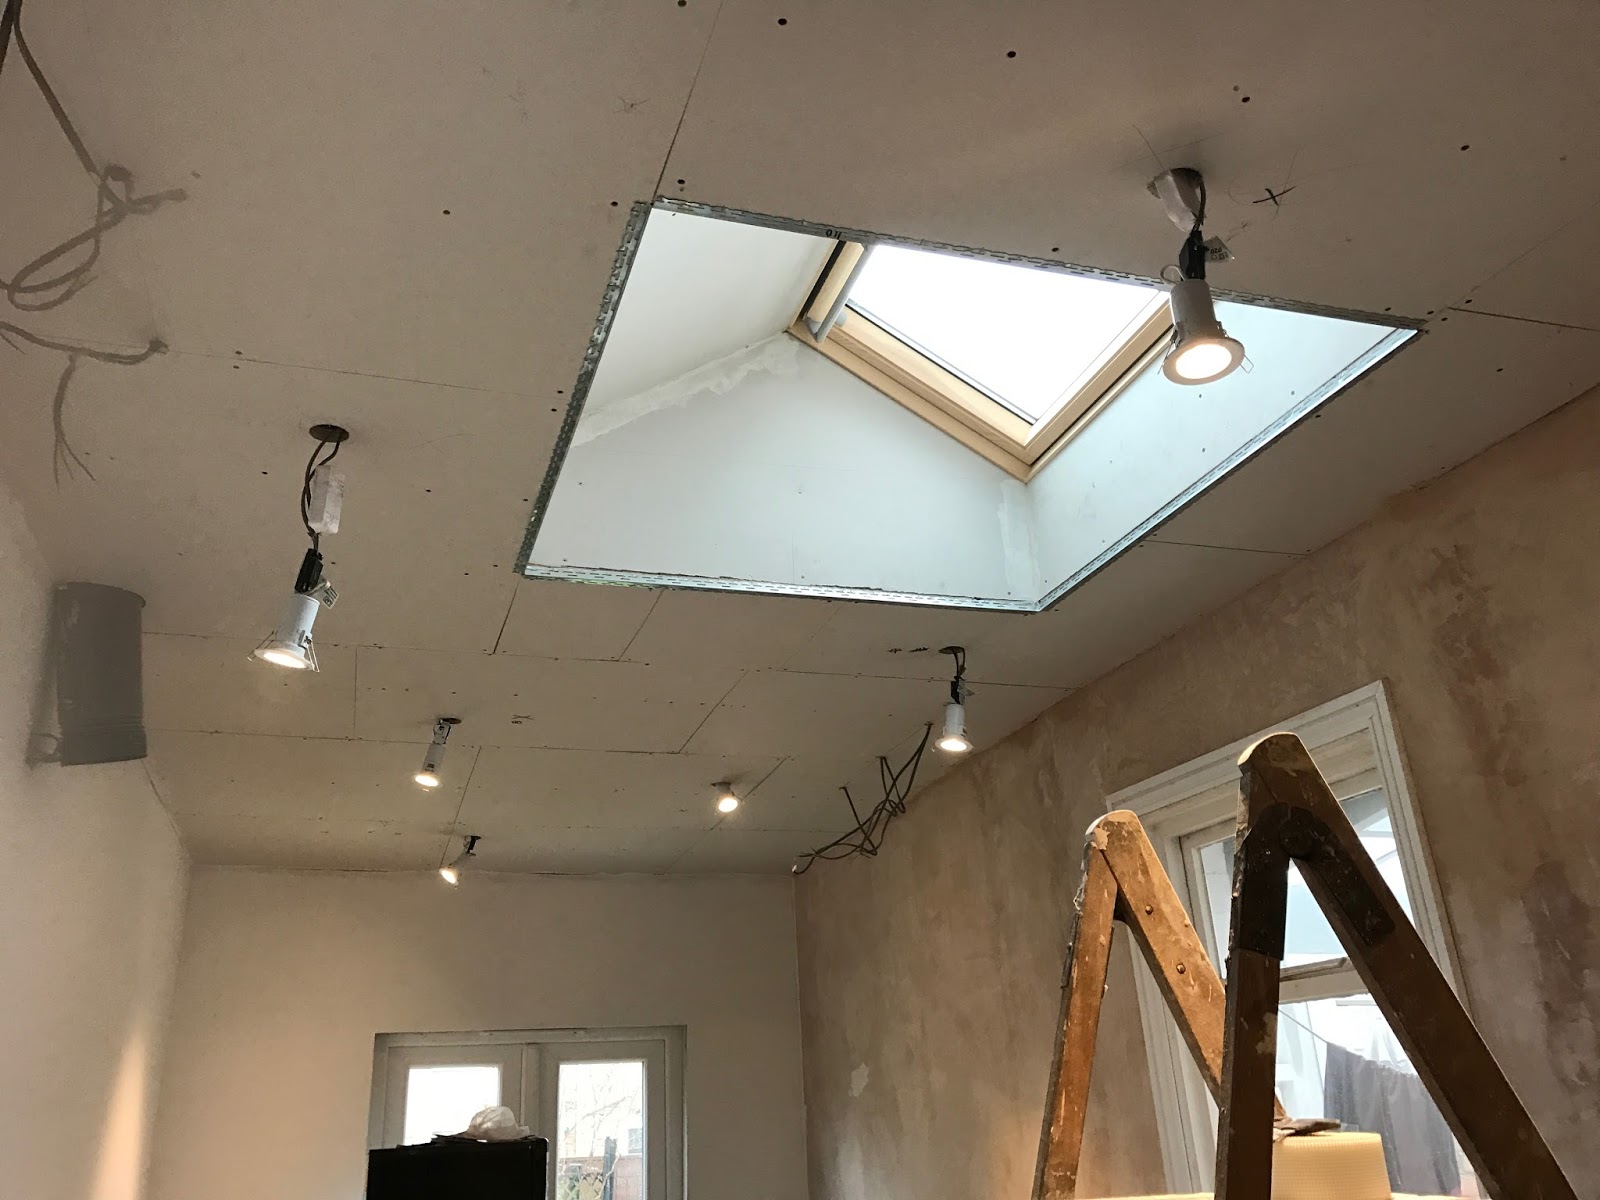
After we'd finished over-boarding the kitchen ceiling, we could then begin to think about lighting. I'd always imagined having two single pendants in this room - the same as it had been before (one where the old kitchen had been and one where it'd been the old shower room) but after we'd boarded the ceiling, I really liked the streamlined, unobstructed view of the new roof window. It was actually a feature of its own and I didn't want anything to get in the way of that. Suddenly pendants in the middle of the room just didn't seem right for the space. I'd always liked the idea of downlighting, but I'm also a fan of doing less work (ahem, lazy? me?). Downlighting is far less simple than just hanging a new light fitting; you need to work out what kind rated of downlighter you need, whether you require a transformer, run a whole load of new cables and then there's the insulation protection if it's recessed into an insulated attic space (like ours). It was a whole lot more work and cost. But, we decided to go for it anyway. I so wanted the roof window to sing on its own! 
Because our kitchen is actually an old extension with an insulated attic space above, we had to consider how we would fit downlights safely with proper protection. Downlights can get very hot and if not properly protected from contact with insulation, it may well set alight. There's a few different products out there to protect downlights, but we opted for some loft lids which we picked up from Wickes for around £5 each (not that cheap when you need six!). 
These are essentially plastic boxes with a hole for the cables, which sit on top of the light and as the name suggests, protects it from insulation. The reason we liked this option compared to some others, was because you can actually sit insulation over the top of it. So it means you wont have any "cold spots" in the ceiling and it will still be properly insulated throughout. No gaps! It's really easy to fit, you literally just apply a bead of sealant around the bottom and stick it straight down over the fitting. The only problem with these however was that they're quite chunky in height. Our attic space actually carries our soil stack from the bathroom and two more waste pipes for the basin and shower too, all of which run very close to the ceiling. It also has a fairly shallow roof (you can't stand up in the attic space) and all of this together basically meant limited room to fit these loft lids to actually fit! In fact, it meant we couldn't have any downlights along almost the entire left side of the kitchen, where the pipes run. And the entire right side, where the roof was just too shallow. Talk about awkward! 
That left us with a very small area where we could have lights. Essentially, just in the middle of the room. Then came the problem of positioning said lights so that they would: A) properly light up the entire area B) be evenly spaced so not to look stupid C) not create nasty shadows from large appliances like the fridge/cooker hood Turns out trying to satisfy all three was basically impossible. We realised our ceiling joists were SO very irregularly spaced (obviously these lights need to be placed between joists, not ON them) and some of our joists were just too narrow to even fit the loft lids. Basically, no matter how hard we tried, something always threw a light or two (or three!) off. So option 2 was to space them "randomly'. By which I mean, with intent but hopefully not look like someone's just vomited them all over the ceiling without thought. The way I envisioned it was that they would be more like little random stars over a nights sky. Whether we achieved that look or not, I'm still not convinced... The idea was to place three of them in a small triangle in the centre of the room nearer to the french doors. And then in a larger triangle around the roof window. 

Whilst Grant was in the attic space dealing with the electrics for the final time, we also decided to upgrade our insulation as well. Current building regs recommend 270mm thick insulation (we only had around 100mm), so we used a 170mm top up roll over the top. We were so very fortunate to know someone who had a couple of rolls leftover from their own renovations and gifted us them for free! Hopefully this will help retain heat in this room during winter - a must for any home without central heating. With the lights AND insulation out of the way, we could finally board up this hole, which by the way we've been rocking for almost two years ever since we did the plumbing for the bathroom. You wouldn't believe the draught through it - I'm so glad to see it gone! 
So overall, turns out downlights are pain in the butt to install if you have an awkward attic space to deal with. We also spent way more than we intended to (mainly because feature lights were not part of the plan!) but hey, good/bad lighting can make or break a room right? Let's hope we're on the 'good' side! What do you think to the 'random' downlights? Do they look vomited up there?! Total Costs(rounded to the nearest pound)New Tools Purchased: Holesaw £6 Arbor £6 Materials Used: Cable & Choc-Box £16 Loft Lids £36 Sealant - free from previous jobs Downlights £48 Feature Glass Lighting £120 Insulation - free/secondhand Total: £232from http://www.kezzabeth.co.uk/2017/02/installing-downlights-feature-lighting.html 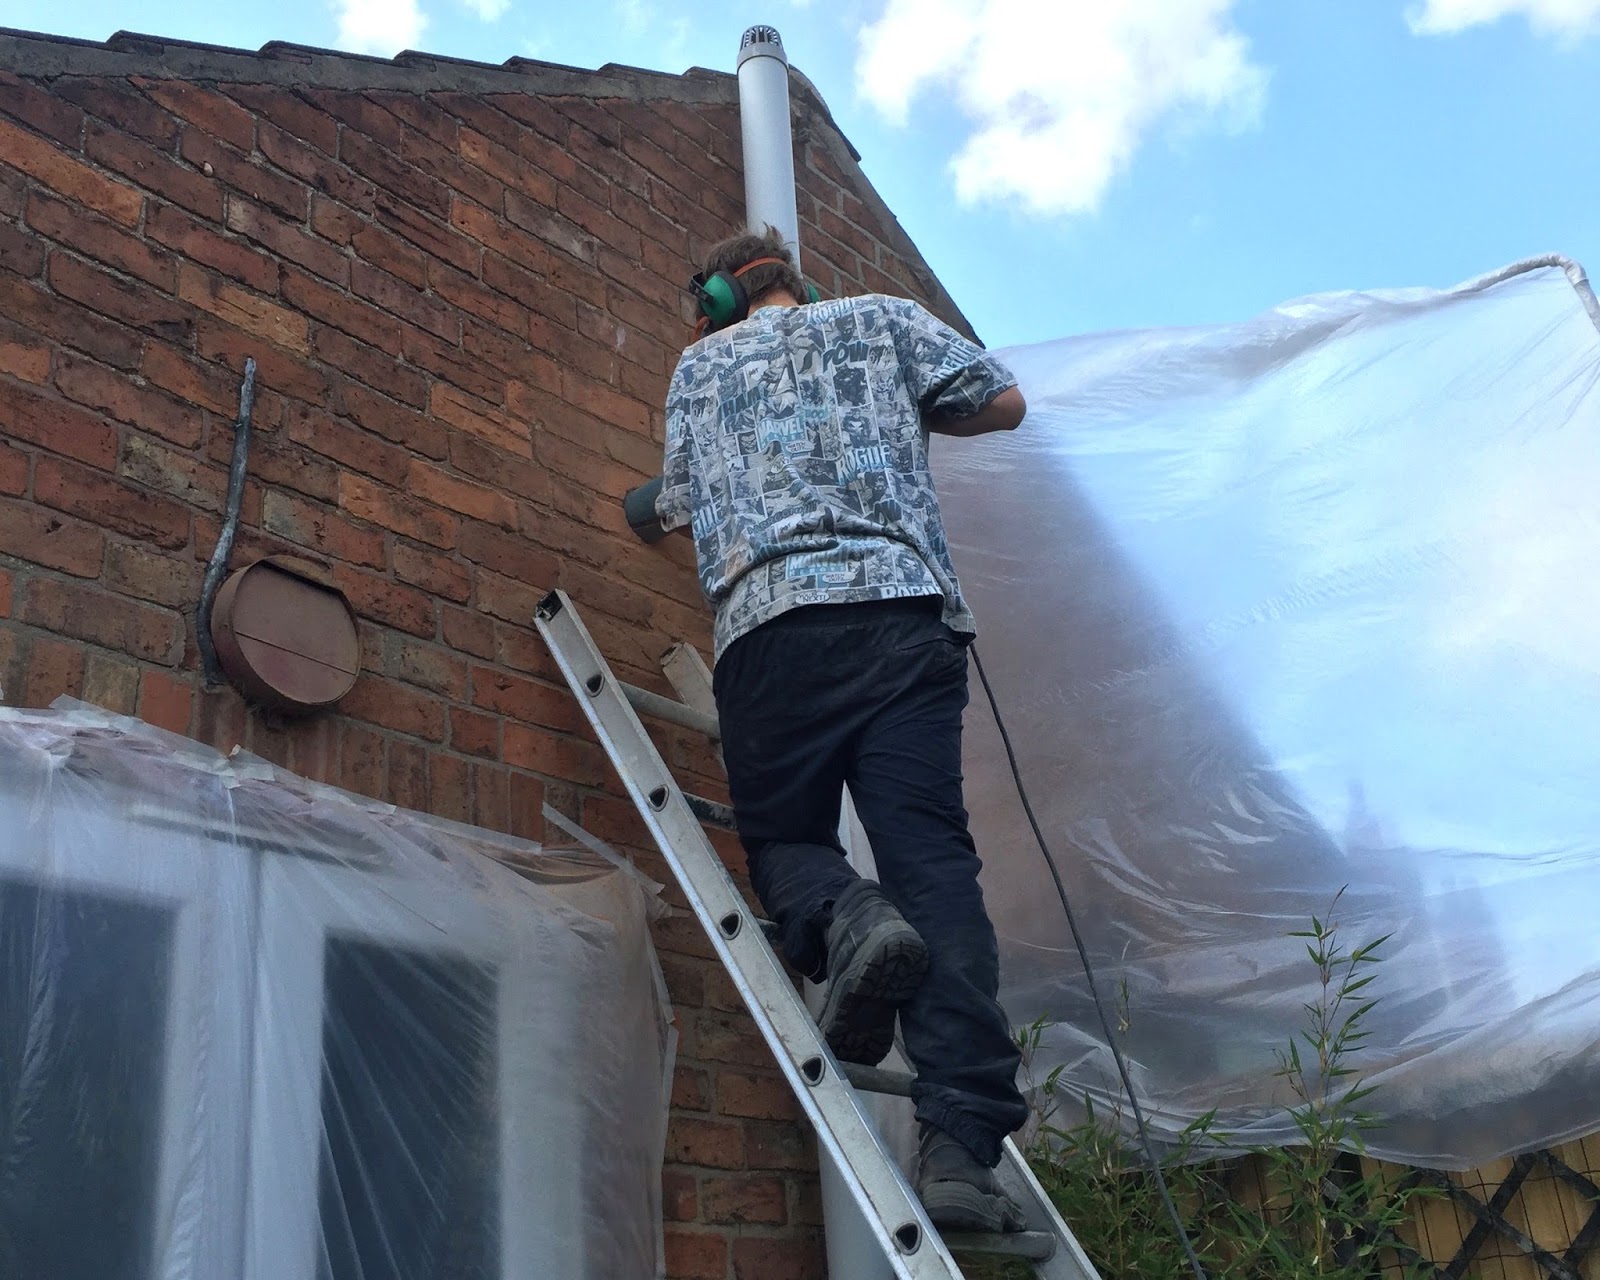
Older kitchens and bathrooms never have extractor fans. I don't know why this is - I presume they just didn't exist back in the day? But you'll never find them. For modern day living; lengthy showers and multiple pans steaming away - not having one is pretty bad. You'll end up with all kinds of condensation/damp problems and for the small cost of putting one in, it's really very much worth it.
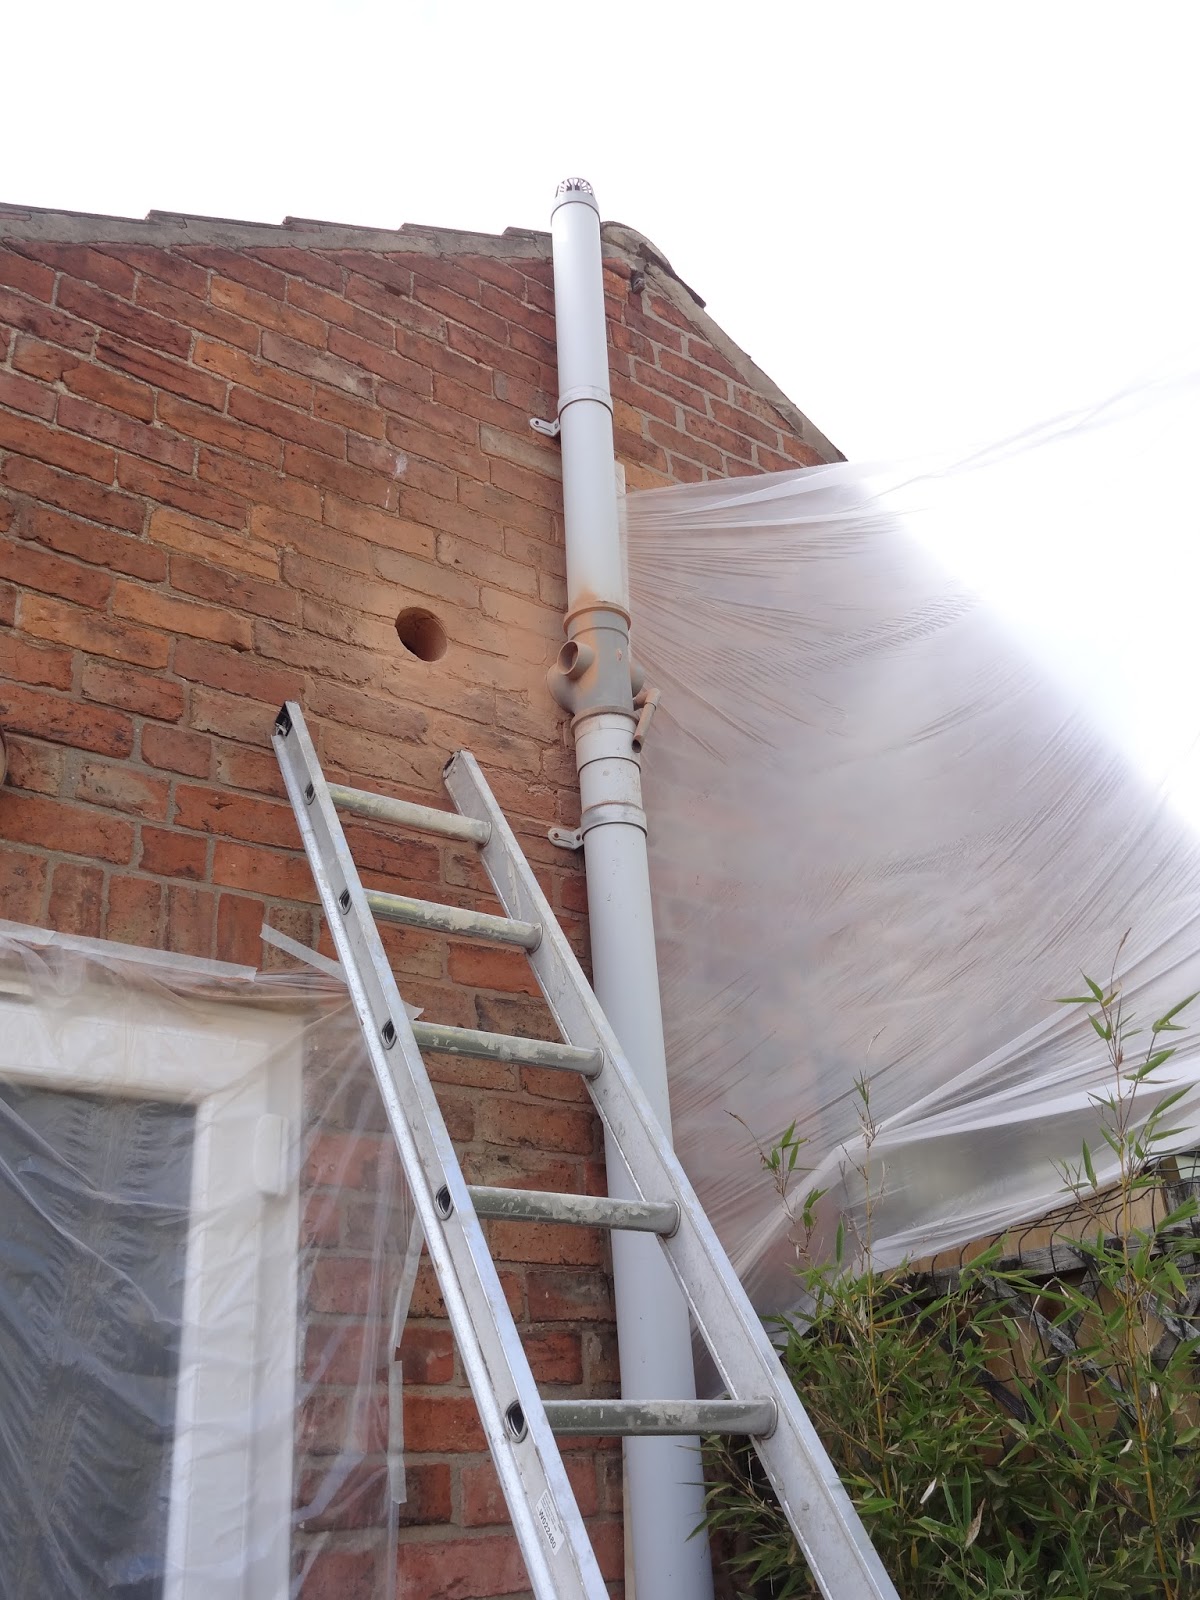
Our kitchen was no different and had zero ventilation for those steaming veggys. So naturally we'll be having a cooker hood and for maximum efficiency, we wanted to vent it outside. We've already installed two extractor fans already (one in our bathroom, one for Grants parents) but we've always done it the hard way. Drilling a bazillion holes and chiselling the rest out. Whilst this costs almost nothing, it takes a freaking long time and chiselling is a right arm ache. So we thought it was about time we invested in a diamond core drill bit and saved ourselves a bit of time/work. You can also rent them if you're not likely to need it ever again.

It's basically a giant holesaw for cutting through brick. Perfect for soil stacks, tumble dryer vents, and extractor fans. It's absolutely vital you use an SDS drill WITH a clutch when using one of these. The reason? Well, imagine hitting a tough bit of brick whilst drilling with this - drills are designed to spin, right? If the drill-bit wants to spin but can't, what's going to spin instead? The drill, pulling you along with it, breaking your arm and potentially falling to your death. (dramatic, but possible!) If you have a clutch, it'll kick in and your drill wont go spinning off with you attached. There's no "maybe I'll be okay" - you absolutely need the right tool for this to be safe.
As well as the diamond core bit, you also need an adapter (they're called arbors) for the end to go into the drill. And you'll also need a guide for starting off - which is basically like a normal drill-bit that goes into the diamond core. It's longer in length and basically creates a pilot hole first which acts as a guide and enables you to have a fixed drilling point whilst you start off. Otherwise you'll be wobbling all over the place and making a bigger mess than necessary.
Because we try to be good neighbours, we firstly made a screen to stop dust blowing straight over the fence and pouring down our neighbours windows. What I had envisioned wasn't quite what Grant came up with - but, despite looking hilarious, it really did work. It's basically dust sheets wrapped around two poles - one of which is just a washing line prop - and then somehow sandwiched into the fence so it can't move. Logistically, it sounds crap and you could see this thing blowing high in the air, far in the distance (what must everyone have thought, I don't know!) - but it did the job!

So things to remember when using a diamond core drill bit - hammer action is a no no - and make sure you keep the drill absolutely level, you don't want to be core-ing at a funny angle. You also don't want to be forcefully pushing the core-bit through the wall, just let the drill do the work.
One thing we quickly learnt about the guide is that it doesn't work so well in mortar that crumbles around it. So when you're starting off drilling, try to position the guide so that it goes into brick and not mortar if you think yours is likely to crumble too. It's also important to remove the guide once you've got the core-bit beginning to go through the wall, otherwise it will keep jamming.

You'll also want to have a good pair of ear defenders and safety goggles are also a must - you really don't want shards of brick flying into your eyeballs. I recommend checking out a site called Engelbert Strauss who specialise in workwear and personal protection for DIY and such-like jobs. You can find both ear protection and eyewear protection on there, as well as ladders and whole load of other DIY type stuff too!

So it probably took less than 3-4minutes to get all the way through the wall - baring in mind this is a single skin wall. I think Grant was pretty pleased about that fact to be honest - both the SDS and diamond core bit are a little heavy and hard to keep fixed at one position for so long. There was A LOT of dust as well, so turns out our makeshift wind sail really was necessary.
And then we were done! Only that wasn't the end of the story. Because, like total idiots we'd only gone and drilled the wrong size hole for the bloody cooker hood. Well, in my defence, we hadn't actually bought the cooker at the time we drilled this - but I presumed 100mm was the standard size and they'd all be that width. Turns out that wasn't the case and we actually needed 150mm. So we had to go back to our old techniques of drilling a bazillion holes and chiselling the rest out. Yes I know, and we had a perfect circle!! AND we'd spent money on the bloomin' core bit! We did consider just connecting a reducer and using a 100mm ducting anyway, but everything I read said it would damage the motor of the cooker hood, make a load of noise and generally just be less efficient. If you're going to do a job, you want to do it right - so we made the hole bigger. But never mind, a bit more work never hurt anyone, right?! Note: make sure you drill the right size hole!

To secure the ducting to the end vent we used some hose clips, as we're actually using a stainless steel ducting, not a PVC one. We stayed clear of cheaper PVC ones as I'd read a few bad things about them and we really needed a ducting that would last, as we wont be able to gain access to it without ripping the kitchen ceiling down. 150mm stainless steel ducting is so hard to find online, but we purchased this one from espares.com which was perfect! :)
We're still yet to hook up the actual cooker hood - that'll have to wait till the kitchen is in, but we're so glad to have gotten this part done!
What do you reckon to our sail-screen? Can you see it taking off....literally? ;)
Total Costs
(rounded to the nearest pound)
New Tools Purchased:
Arbor £8
Diamond Core Drill Bit £30
Drill Guide £3
Materials Used:
Flue £12
Hoseclips (5pack) £15
Vent Grille £6
Total: £74
*Collaborative Post. All words and opinions are my own. Thanks for supporting the brands who support this blog! from http://www.kezzabeth.co.uk/2017/02/diy-venting-cooker-hood.html 
Whilst we don't really celebrate Valentines, I can't help but lust over beautiful themed interiors, especially those on Instagram - where I spend most of my free time scrolling through squares and squares of homes I only wished I owned. If you're not on Instagram yet, where have you been?! It's quickly becoming the new Pinterest for home & DIY inspiration and I absolutely love the community on there.
One day we'll go all out on the decorating-front for a celebration; (any celebration - Easter, Christmas, Valentines - I'm not fussed!) there'll be bunting, flowers, food, music, it'll be so pinterest-worthy, all my dreams will have come true. But until then, I'll make-do with small corners of my home having a touch of festivity instead.

And of course one the easiest ways to bring a touch of theme to a room is through chalkboards! They can be switched to different themes at the touch of some chalk. This star chalkboard is from a DIY I did last year with Rustoleum (go check it here!) but since then it's been sat looking pretty depressed in my office waiting for the day I felt creative enough to do something new with it. The problem is, chalk is hard to write with. It kind of just gets everywhere and doesn't have that crisp chalkboard calligraphy look you see on every pinterest photo going and I just couldn't get it the way I wanted it.
Until I discovered chalk-pens! These ones are from Chalkola - a small independent family owned business which can also be found on Amazon. The pens are liquid, but made from chalk. It means you get a clean crisp line, unlike traditional dusty chalk. They dry so that they wont smudge - great if you have little hands that like to touch everything ;) And no problem with smart-arses changing words like "house" to "ouse" either! But they obviously do erase too, simply by wiping over with a wet cloth. It makes chalkboards much more durable and practical. I love that you can layer colours and even draw art with them too!

They can also be used on any non-porous surface including ceramics, glass, mirrors and whiteboards to mention a few (always test surfaces first though!). I think they're pretty awesome. Great for leaving notes on random stuff - mugs work a treat! Anyone else need to leave a bazillion reminders for their other-halves? "don't forget to turn the grill off" and such-like? But of course, with Valentines, you could even get romantic with it ;)


They come in a whole range of different colours and tones - from vibrant neons to earthy tones. The earthy tones are personal faves! I so desperately want to take a calligraphy class (I'm sure they exist!) and become the master of chalkboard writing. But until then, I'll just practice with my new pens and make a better effort to update this little corner of our home. A countdown to spring is the next idea on the horizon - surely I'm not alone in being fed up of this cold winter weather?!

But for now, here's the one little festive/themed spot of my home for this Valentines. I hope you all have a wonderful V-day too, even if it's amongst plaster-dust, like ours! I must deeply thank the Morrisons wine & dine for 2 meals - because there sure as hell wont be any cooking in our non-existent kitchen this Valentines! Who said renovating can't me romantic?! ;)
PS. If you're interested in these pens, Chalkola are offering 20% off any of their pens with code: 20OFFSTR
*Pens were kindly gifted by Chalkola. All opinions are my own. Thanks for supporting the brands who support this blog :)
from http://www.kezzabeth.co.uk/2017/02/valentines-chalkboard-art-with-chalkola.html
As I’ve had some quiet time away from my daily grind I’ve listened to some amazing preservation business ideas from these people. Some of which could change not only the way we think about preservation but how we think about our buildings as a whole. I’ve seen people fired up to change the world and cause some serious disruption to the status quo on the scale of giants like Steve Jobs and Elon Musk. You probably think I’m exaggerating and living in a world of delusional hyperbole, but I’m dead serious. There are 330 million Americans and every one of them needs a place to live. A house, an apartment, an loft, condo, co-op, a roof over their head. They don’t all need a computer, iPhone, electric car, or trip to space (though all of those would be cool). They need a safe, warm place to live that is both sustainable and maintainable. They need a home. And preservationists are in the business of fixing homes. Let’s play a little game of what if… What if…Preservationists could get off their arrogant, high horses and stop being seen as anti progress but rather pro sustainable progress. Preservationists could figure out how to translate the hundreds of studies they have from technical jargon into plain everyday English so that people can finally understand the blaring truth that the greenest building, window, wall, floor, is the one already built. Preservationists could provide low-cost housing options for people who need it by restoring older buildings instead of letting developers raze them to create high end condos for the rich. Preservationists could be known as historical preservationists instead of hysterical preservationists. Preservationists could be seen for what they really are which is someone who wants to use and reuse the buildings we have rather than cramming our landfills full of more and more junk. Preservationists could expose the untenable waste and lies behind planned obsolesce in construction so that public would see it and make better choices. What if, what if, what if? The list continues to grow in my mind. As fast as I can write them down new ideas come into my mind. But the over-arching theme is that historical preservation needs to get its act together! How can a group of people who have not only the truth on their side, but the studies to back it up fail to communicate that truth in a coherent way to the masses? What is that truth? I’ll tell you right now, but I’m also going to promise to you that for the next month I am going to show you the evidence to back it up in a way that our soundbite culture can digest and understand. If at the end of this next month you aren’t 100% convinced of the claims I am about to make then I will eat my words and publicly proclaim on this blog “Historic preservation is of no value!” My Four Claims:
I encourage you to come back every week and read what I’m about to start posting here and tell me if I am able to prove the claims I have just made. I dare you. I expect kickback on these topics, maybe not from my regular readers who already love their old houses, but from those who don’t agree with us. So share this with all the skeptics you know. Send it to flippers, developers, mayors, city councils, neighbors, anyone who doesn’t buy this historic preservation gobbledegook. Let’s see if I can make you a believer! The post Proving Preservation appeared first on The Craftsman Blog. from https://thecraftsmanblog.com/proving-preservation/
|


 RSS Feed
