|
I’m not the only one noticing this trend showing up on every television network when it comes to remodeling. Bigger renovations, more money, more products, more, more, more. We Americans seem to have an insatiable appetite for big home makeovers and a definite desire to keep up with the Joneses.
My big issue is with the networks thinking that all we want or need to see are HUGE projects with massive budgets that are completely out of reach for most us. Seriously, can any of my readers drop $200k on a full home makeover? Maybe a handful only, but most of us can barely afford a budget bathroom remodel. Even the old guard at This Old House have upped their renovation budgets into the stratosphere. Do we really need more and bigger home makeovers? I’d like to challenge that idea! No More Home MakeoversDear HGTV, I love you. Seriously I do! You and your sister DIY Network, which would be weird if you were people, but since you’re television networks, I’m sure it’s OK. Here’s the deal girls, I love a big delicious home makeover just like a night out at the fanciest restaurant in town, but sometimes I like a hotdog too. Not a gourmet dog, just a regular 50¢ ballpark dog with all the nitrates in the world. I can’t eat foie gras everyday! Full disclosure: I’ve never actually had foie gras, but I hear it’s very rich in both taste and cost so it seemed like the right choice here. Dave Ramsey has a great and pithy quote that he uses about having too much money. He says that you can only eat so much lobster before it starts to taste like soap. Admittedly, I haven’t gotten to that point yet, but the point still stands. We can only handle so much opulence whether it is in food or home renovation and I feel like the makeovers we are being bombarded with have gone so over the top that we are nearing burn out. I know economic times are good right now in late 2018, and more of us have more money to spend. This is a good thing, but just because we can spend more money doesn’t mean we should. Where are the creative little projects of 10 years ago? The night stand refinishing, a bathroom tile project that doesn’t involve tearing down walls and changing floor plans, a cabinet refacing and painting? There are so many small projects that we could all learn from and tackle on our own rather than feeling the pressure to drop six figures on a kitchen. I’m a licensed contractor so I know what I am saying sounds contrary to savvy business, but there will always be big projects that need contractors. I’m talking about TV and social media making us feel like we are slackers if we do anything less than a full gut remodel. Room for the Little ProjectsThere is most definitely still room for the little projects. The projects that create a huge improvement without a huge budget. Using the cabinet example above, if you don’t need completely new cabinets and refacing will suffice then why not do it? Remember, just because you have the money doesn’t mean you have to spend it or that there will be the ROI to support it. On this blog, I rarely show you a full room or full house project, but what I will show you are a ton of little projects that you can do yourself. Wanna build a window screen, restore a window, or replace a floor board? Yeah, I can show you that and if you need to do more than one, then just rinse and repeat. As for me, I’d rather see fun little weekly projects like my friends Sam at DIY Huntress and Brad at Fix This Build That do then watch a full home makeover on a network who says the budget was only $22,000 when I know that in reality the cost should be closer to $62,000. Tastes are constantly changing and we’ll see where this trend of big home makeover projects goes from here. They may get even bigger in the coming years, but it feels like we may be at the peak soon. Personally, it’s all starting to taste a lot like soap to me. What do you think? Am I off base and out of touch, or have you felt it too? Let me know your thoughts in the comments below! The post No More Home Makeovers! appeared first on The Craftsman Blog. from https://thecraftsmanblog.com/no-more-home-makeovers/
0 Comments
While most contractors spend their afternoons at the lumber yard or Home Depot, I tend to find myself at my local architectural salvage yards just as often to find what I’m looking for. It is easy to lose hours wandering around at your local salvage yard, so I wanted to give you a few tips for how to find what you are looking for quickly, as well as some ideas on how to use these places as great inspiration for your next project. Tip #1 Bring a SampleAn architectural salvage yard is not like your typical supply store. They have a greater variety of items that are constantly changing and available in irregular quantities. Maybe you need 12 feet of crown molding in a pattern that you can’t seem to find anywhere. The best way to find a matching piece is to pull a portion down and bring it with you. It may seem like extra work, but having the actual part you need on hand helps immensely. Sizes were not standardized for most architectural elements on old houses and a difference of just a 1/2″ can make what would otherwise be a good fit into the wrong piece for your project. 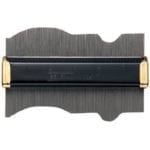
Hardware is another good example where having a sample of the specific item can change everything. Doorknobs have different thread patterns that may not fit all doorknobs. Mortise locks have different backsets and thicknesses that may not be clear to you until you hold it up to the options that you find at your local architectural salvage store. If you can’t bring a sample of what you need, then having a picture and as many specific measurements is a close second. Measure everything you can possibly think of on the item you are hoping to replicate, so that you’ll be prepared when browsing at the store. There are also inexpensive Contour Gauges you can use to help you match a molding profile. This will allow you to check molding profiles to ensure that they match without pulling the molding off of the wall. Tip #2 Ask for HelpYou went on treasure hunts as a kid, right? Me too, and while they were a blast, I don’t have time to be sorting through hundreds of sash locks for half of a day to find the one piece I need. You might have the one architectural salvage yard where everything is neatly organized, but in my experience, they look about as clean as a 5-year old’s bedroom. How can you ever find what you need? Ask! There are always a few employees who can help point you in the right direction, which can helpful, but if you really want to find your object with laser focus, then you have the find the big boss. There is almost always at least one person at every salvage yard who knows exactly where even the most minute item is. Usually it’s the owner, because they are the one who went picking four years ago and grabbed that one door you are looking for and remembers where he put let it half a decade ago to gather dust until you showed up. The inventory is largely kept in the head of one very committed person who knows and loves this salvage business more than life itself, and they are the ones to ask for help. Another plus of asking is that you can often hear the story behind the item. Where did it come from? How old is it? What was it originally used for? This is some of the best stuff to me! Tip #3 Bring a Tape MeasureYou know that the stuff in an architectural salvage yard isn’t organized into 8 footer, and 16 footers. They’ve got whatever they could rip out of a building before the wrecking ball chased them away. Again, whether it’s hardware or moldings, you never know what dimensions you’ll find. So, when you take the trip to the store, bring your tape measure with you. You’re not just going to check the length and width of boards, but also the thickness. Thickness of most wood products has varied greatly across the country and the years. 2 x 4’s use to be 2 x 4 rather than the 1 1/2 x 3 1/2 they are today. Most wood products were thicker in the old days, so you’ve got to make sure what you’ve got matches. You could also bring a Thickness Gauge if you are looking for something super specific. That tape measure will be immensely helpful because while that awesome gem you just found might look like just the right size in this huge salvage shop, it can be deceptive. Items have a tendency to look smaller in large rooms and large in small rooms, so don’t be fooled by the appearance of what you see in the store. That 60″ sink might look just right, but it will never fit in the 36″ opening you have at home. Measure the dimensions of the area you are looking to find something for before leaving home and write them down so that you have a guide when you’re at the store. Tip #4 Consider Tweaking
Doors are the easiest example. If you’re looking for a custom sized door, then really anything slightly larger that you can trim down will work. You can also do things like pad out the jamb slightly to accommodate a door that is only 1/2″ too small, but would otherwise be a great fit. Think creatively about what changes you would have to make and if they are feasible before you dismiss an item that might be a good fit. Often, when it comes to architectural salvage, close enough is something that will allow you to take it the last 10% to the finish line. Using Architectural Salvage for InspirationThis one isn’t really a tip, but rather my favorite way to have fun with architectural salvage. All the ways above will help you squeeze the usefulness out of your trip to the salvage yard, but sometimes you can make a trip to the store just for plain fun. Here’s what I’ll do: Sometimes when I am devoid of inspiration for my next project, I’ll swing by my local salvage yard and just wander around looking at some of the more interesting and unusual items they have, while thinking about ways to incorporate them into a cool new project. It really gets my creative juices flowing and get me out of the day to day drudgery. All those creative ideas on Pinterest came from someone thinking creatively and repurposing something old into something new. Sometimes it’s simply using salvage pieces as decoration and sometimes it’s about turning theming into something completely new, like building a table out of a window sash. Open up your eyes and your mind to the thousands of square feet of possibilities contained in your local architectural salvage. Check out a couple earlier posts for some clever project ideas that you can make with salvage below. Hopefully this post will make your next trip to a salvage yard more productive. Use these tips and you’ll save time, money, and trouble the next time you are looking for that new old piece! What’s been your best find at the salvage yard? I’d love to hear about it ion the comments below! The post 4 Tips to Using Architectural Salvage Yards appeared first on The Craftsman Blog. from https://thecraftsmanblog.com/4-tips-to-using-architectural-salvage-yards/
Sometimes, I do embrace new technology when I find a better product that does the job more effectively than the old school stuff (like phillips head screws). Those times are few and far between, but today I want to talk about one of those items- Hardie Trim. If my grandfather were still building houses today, I honestly believe he would be using the stuff, and while that’s not a very scientific approach, it’s the rule of thumb I use when judging a lot of products. In full disclosure, James Hardie is sponsoring this post and video. So, give them some social media love if you think their products might be right for your project! This was a project of mine that was already in the works before their support was offered, and I selected and purchased all the materials myself. The opinions, as always, are entirely my own. The ProblemWorking in rainy Florida, I deal with rot at levels that other folk only see in their nightmares. Honestly, it’s awful down here! And most historic buildings I work on are made of wood. That means I have to find creative ways to deal with wood rot. The biggest problem areas I encounter are down near ground level where splash back and plants create a breeding ground for rot and mildew. It’s always the bottom couple courses of siding and trim that are constantly being replaced down here and I get tired of the callbacks and frankly, I hate doing work I know won’t last very long. This specific project is the trim back door of my house that empties out onto the craftsman style deck I built last year. The problem is that we get torrents of water pouring over the awning in our summer rains and things just don’t have a chance to dry out. The wood trim around the door was rotten enough that I could put my hand right through it and I had already replaced it a few years ago because of the same problem. This time I wanted to replace it for the last time and use something that wouldn’t rot anymore. The SolutionFor the project I’ll be using 4/4″ Hardie Trim Boards in smooth texture to match the existing trim boards on my 1929 Bungalow. One of the things I like about this product for old houses is that it also comes in a 5/4″ version so you can match the thicker trim styles that are common on historic buildings. I’m using the pre-primed Hardie Trim because my house is was recently painted and I need to match the existing paint color precisely, but you can get Hardie Trim factory painted in dozens of colors with their ColorPlus® Technology if you want to skip the expense of painting afterwards. James Hardie claims that their ColorPlus® Technology is fade resistant and comes with a 15-year limited warranty that covers paint and labor, protecting against peeling, cracking, and chipping which is a lot better than any warranties I get from my painters today. I don’t have any experience with the ColorPlus finish, but as a contractor that warranty eliminates the risk of callbacks on my dime and helps me sleep better at night. Why Not PVC Trim?Here’s why not- PVC is plastic and plastic is possibly the least green building material on the planet. Couple that with the fact that PVC expands and contracts greatly with temperature changes (sometimes up to 1/2″) and that makes PVC something I would never use in one of my projects. I can’t have trim joints opening up and letting water inside wall cavities. Some pros who use PVC swear by screwing and gluing their joints to prevent them from opening up, but that is a lot of extra work to make the product do what it ultimately should do. With Hardie Trim, I get to cut to length and caulk the joints just like wood. Installing Hardie Trim on an Old HouseCheck out the video below to see how I handled swapping out the rotted wood trim with the new Hardie Trim. It’s pretty straight forward, but you’ll definitely get some tips and tricks to make your install a little easier. If you’re a contractor, you might also want to look into their free Contractor Alliance Program which can provide you with extra training and marketing help to make you a better installer. The resources available are pretty great including sales support, rewards for contractors who are serious installers, and they’ll even send you leads from their site for homeowners who are interested in having Hardie products installed on their house. It’s definitely worth a look. The post Installing Hardie Trim on an Old House? appeared first on The Craftsman Blog. from https://thecraftsmanblog.com/installing-hardie-trim-on-an-old-house/ 
Do you remember almost two years ago we bought a pair of secondhand glazed doors for our conservatory and fitted them? Two years ago. Well, we never got round to fitting any door handles. I know, it's shocking. Truth be told, the handles I had bought turned out to be way too big for the door. They protruded like crazy and for such a small door, just didn't look right. I think they were actually meant to be for an external door (oops!), so we never fitted them.
Now, two years on, I'm on a mission to get finishing all these little niggly jobs off, so the time has finally come to sourcing new handles and getting them fit!
Read more »from http://www.kezzabeth.co.uk/2018/09/how-to-fit-rebated-door-latch-on.html 
Our conservatory is a bit of a marmite room. It's a very old conservatory (built in the 80s) that heats up to about 1000degrees in summer and then freezes to about -1000degrees in winter. I'm exaggerating, but you get what I'm trying to say - it's not a perfectly formed extension. It's what typical 80s conservatories are known for; being a tad impractical.
Despite that, knocking it down seemed like a total waste since we would only have gained a tiny extra bit of space in the garden. I think having it as a living space is actually more beneficial, plus, I'd always wanted a conservatory. It might not be the conservatory I had dreamed of, but I certainly wasn't letting it go!
Read more »from http://www.kezzabeth.co.uk/2018/09/creating-indoor-garden-room.html 
Knob and tube wiring is one of the original forms of electrical wiring in homes, popular from the late 1880s until the 1930s when it fell out of favor. At the time, it was the standard for wiring new electrical installations due to its relatively low cost compared to the other options of the time like armored cable and conduits, which could cost two or three times as much as knob and tube wiring. Today, there is a definite fear of old house wiring, especially when it comes to knob and tube wiring. Some of that fear is reasonable and some of it, like anything, is just blind fear from lack of knowledge. I wanted to lay out the facts about knob and tube wiring for you so that you can be informed and understand exactly what the issues are and how you can safely resolve them. I’ll preface this by saying that I am not a licensed electrician. I am a licensed general contractor who works exclusively with historic buildings and have had plenty of experience with knob and tube, as well as learned a lot from the very skilled electricians on my job sites. Dealing safely with knob and tube is something that everyone who lives in an old house can and should learn, so keep reading below. What is Knob and Tube Wiring?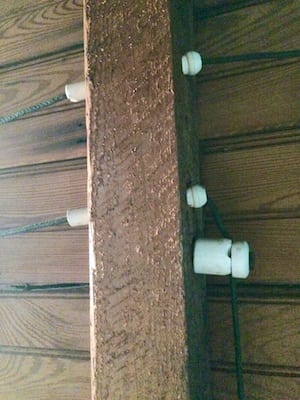
Knob and tube wiring is a simple form of wiring that gets its name from the porcelain knobs and tubes used in the installation process. The wiring itself is simple copper wires wrapped in a rubber sheath (earlier versions were wrapped in asphalt soaked cotton cloth). These wires were installed by running them in the walls between porcelain knobs, which kept them properly tensioned, away from the wood framing, and facilitated easy direction changes in the wiring. So, that’s the “knob” in knob and tube, now lets look at the “tube”. The tube part of the name came, once again, from porcelain tubes that were drilled and inserted into any framing that the wiring needed to pass through. These tubes allowed the wiring to pass through the framing without touching it. This helped prevent the wires from contacting the framing, being crushed, or the sheathing being rubbed off as the house settled or moved with the seasonal weather changes. The whole system was cleverly built to accommodate for the construction methods and electrical needs of the time. The wires generated a decent amount of heat when a electrical current passed through them. That heat was why they were kept away from the framing elements by the porcelain knobs. This allowed the heat to dissipate in the surrounding air keeping them at a safe temperature. Most installations were intended to safely service 10-amp loads per circuit without generating too much heat which was more than adequate for the needs of the time. Splices were typically installed by twisting the two wires together and then soldering the joint and wrapping it in asphalt soaked cloth, which made for mechanically and electrically very strong joints when done properly. Advantages of Knob and Tube WiringYes, believe it or not, knob and tube wiring had some distinct advantages over its historic counterparts! Low CostKnob and tube was considerably cheaper to install than its competitors, which were two and three times as expensive. Early on in the electrical field, the materials were the expensive part of the equation rather than the electrician’s wages. As electrical systems became more advanced and electricians became more skilled, labor costs for electricians went up much faster than the materials costs for electrical components. Knob and tube wiring is very labor intensive to install, so this change in labor vs. materials caused knob and tube installation prices to outstrip its competitors and was one of the leading causes of its decline in popularity. PorcelainAnother advantage of knob and tube wiring was the use of porcelain insulators. Porcelain is extremely resilient and has an almost indefinite lifespan providing excellent protection with almost no expiration date, which is hard to find. Also, the porcelain knobs were excellent at preventing the wires from being tensioned too much during the installation. Disadvantages of Knob and Tube WiringYou knew I was going to get to it eventually, right? The doom and gloom part? Yes, knob and tube wiring has a very distinct set of disadvantages too. No GroundThat’s right, there is no ground wire included in a knob and tube setup. Just a hot and neutral wire were included. It wasn’t until the 1960s that a dedicated ground wire was consistently included in every circuit. The ground is important should there ever be power surges or overloaded circuits. If everything operates perfectly then you don’t need the ground wire, but since when does everything go perfectly? InsulationKnob and tube works best when it has air to breathe. If you cover it with blown-in insulation it is not able to cool down and dissipate heat like originally intended, and this increases the potential for fire. It’s not just insulation that can cause this issue but really anything else that is stacked around the wires that blocks air flow. Even the current building code does not allow for insulation to be installed on top of active knob and tube. Worn SheathingUnlike the porcelain insulators, the natural rubber or asphalt soaked cotton sheathing naturally wears out and breaks down over time, causing the wires to be exposed and increasing the potential for electrical shocks and also fire. During renovations old brittle sheathing is very easy to tear or damage, creating even more chances for danger. Increased Power NeedsThis is, in my mind, the biggest issue with knob and tube wiring. The electrical needs of a house in 1918 are dwarfed by a house in 2018. Electricity was used mainly for lighting purposes in the first half of the 20th century with only minimal appliance usage. Now, with central AC, computers, TVs, internet, washer, dryers, refrigerators, etc. our homes have become huge energy users, and antiquated electrical systems have real trouble keeping pace without modern needs. A typical house in the 1920s had a 60-amp main service panel (the total electrical service capability the home can handle). Today that main service panel is usually at least 150-amp with most larger houses needing 200-amp service. Knob and tube wiring was never intended to handle loads anywhere close to that. Improper ModificationsAnother big issue is from modifications done with shoddy workmanship along the way. Improper splices are just one part of it. Overloaded circuits like we just discussed often happen when the power needs of the home increased marginally. For example, an original 10-amp knob and tube circuit may have been slightly overloaded so the homeowner changes to a larger 15-amp fuse to prevent it blowing so often. Years later, that same circuit gets unknowingly overloaded even more as new appliances are installed and gets even more dangerous. Should You Replace Knob and Tube Wiring?Alright, you’ve got the advantages and disadvantages of knob and tube wiring, and now you need some answers about what to do? In my opinion, knob and tube wiring should be replaced in almost all circumstances. There is very little benefit other than saving money that knob and tube provides today and when compared to the potential dangers, it just doesn’t add up. Does that mean you need to tear your walls down to replace it? Definitely not! Knob and tube does not actually need to be removed from your walls, it just needs to be disconnected so it is no longer active. A quality electrician can completely rewire an old house without taking down whole walls, but rather punching small tactical holes to fish their new wires into place. Don’t spend the money to fully remove every trace of knob and tube, just be sure that you have every circuit fully disconnected and rewired with modern wiring. You’ll sleep better, and ultimately get better insurance rates when your house has modern wiring. And those insurance savings can pay for the cost of the rewire in less than 10 years in most cases. When you account for the decreased risk of fire or other electrical problems rewiring is a no brainer. What do you think? The post Knob and Tube Wiring: What You Need to Know appeared first on The Craftsman Blog. from https://thecraftsmanblog.com/knob-and-tube-wiring-what-you-need-to-know/ 
If you follow me on Pinterest, you may have seen I've been pinning a ton of attic conversion ideas over the last month. We might still be a long way from beginning any work up in our attic - but a girl can dream right?! Anyway, in my mad month of pinning, I came across some simply awesome staircase ideas. Ideas that make you want to rip out your existing staircase and fit a whole new one. In collaboration with Fontanot Shop, an Italian-design staircase manufacturer, where you can buy contemporary staircases, I'm sharing some of these awesome designs with you. From elaborate luxury designs to simple DIYs, whether you're looking to buy a new staircase or make simple alterations to a current one - I've got a whole heap of staircases to wow you with. So, if you've got a thing for staircases (you will have by the end of this post!) then, check these awesome designs... 1. The Floating StaircaseI absolutely love this idea! These kinds of staircases take up a lot less room than staircases which are 'boxed in', leaving a room to feel more spacious, lighter and brighter and not to mention, make an absolutely stunning feature. Particularly so when paired with lights, such as in the image above. For this design to work, you would need to ensure the wall the stair treads are hung up on is strong enough to take the weight. Otherwise, the design and installation are relatively straightforward and can really bring the 'wow' factor to a room. 2. The Spiral StaircaseSpiral staircases, or otherwise known as circular staircases are great where space is limited. Their design means they don't need to take up a large amount of floor space beneath and they can fit into simple vertical spaces, without the need for a large area to incline. For small houses, this type of staircase is a particularly a good option. Spiral staircases can suit both industrial, modern and classic spaces due to their wide range of styles. I think they're quirky, add a bit of fun and can make a really interesting feature within a room. 3. The Glass StaircaseIf you want to simply refurbish an old staircase, adding glass sides is a brilliant way to make an upgrade. It will add tons more light to a room, particularly if your hall or landing has no natural light. It will also open the space up, give a real contemporary modern feel to the room and will add a touch of luxury as well. The only downside to having a glass staircase is that you might find yourself wiping fingerprints off the glass a little more often than you'd like. 4. The Staircase with a SlideIf you want to add a bit of fun to your house, how about incorporating a slide into the stairs? This would be a child's actual dream come true, but let's face it - even adults could have a bit of fun with it as well! A staircase with slide doesn't have to be expensive, in fact, there are loads of great DIY tutorials out there showing you how to adapt an existing staircase to suit this design. I've got to say, I would certainly give it a go! 5. The Bookcase StaircaseThis is probably my favourite design. How to incorporate storage within a staircase, in a really simple and effective way. This idea might not be for everyone, but if you like the eclectic design and of course a good book, this would certainly make a unique feature! 6. The Staircase with Pull-Out StorageAnother great solution for maximising storage space. Pull out drawers! Perfect for storing away shoes and winter knitwear whilst having all those things right on-hand when needed. Because who doesn't sit on the stairs whilst putting on their shoes? This design might take some clever planning and would need to be well thought out, but I think this is an ingenious idea that all staircases should have. 7. The Ombre & Patterned StaircaseOn a budget? No problem. Painting a staircase is really simple and easy way to add style and give it a whole new lease of life. I absolutely love these ombre and patterned staircases. You can be as bold and as daring as you want, with vibrant colours and punch patterns. Or you can opt for something more simple and understatement, like colourful spindles. I think this is definitely something I would consider for our own house! How about you? So that's it! 7 staircase ideas to add a bit more style and impressiveness to your home. Which one's your fave? *Collaborative Post from http://www.kezzabeth.co.uk/2018/08/7-creatively-awesome-staircases-ideas.html
Whether your house has your original tub which is in need of repair, or you are looking to find an appropriate replacement, this post will help you with all aspects of that all important part of your historic bathroom- the clawfoot tub. History of BathtubsBefore indoor plumbing, bathtubs were fairly crude and light weight. They were made to be pulled out when a bath was necessary and put away for months at a time since bathing wasn’t an everyday occurrence in the 19th century, leaving most of us stinky bulls. The simple design of these early bathtubs was usually tin, lead, or copper lined wood boxes that were filled with buckets of water and no drains. The idea of indoor plumbing was fast developing on a municipal level in cities like Philadelphia, which was the first city to switch from hollowed out trees and terra-cotta to cast iron pipes in 1804. Other cities began following suit soon after and the trend toward modern indoor plumbing was cemented when in 1829, 26-year-old architect Isaiah Rogers, shocked the world with his Tremont Hotel project in Boston that featured all indoor plumbing. A full 4 years before The White House had even gotten plumbing! Indoor plumbing, like most new inventions, was first reserved only for those who could afford this new luxury, but it didn’t take long before the general public was able to enjoy the benefits of better hygiene. The clawfoot tub had its origins in mid 18th century Europe, where the claw and ball foot design was initially created in Holland and soon spread to England and the states after that. The first clawfoot tubs were often the metals I mentioned earlier with painted exteriors that would peel and chip due to the expansion of the tub when water was added. This was a common annoyance and one that hindered full acceptance of the design until the 1880s, when a Scottish-born inventor named David Buick created a process to bond porcelain enamel to cast iron. The Clawfoot Tub Goes MainstreamWith the process to securely bond porcelain enamel to cast iron, the clawfoot tub had hit its sweet spot. The costs of indoor plumbing were dropping precipitously as were the costs of these tubs bringing into the mainstream. Combine that with the increasing interest in soap and regular bathing, and the clawfoot tub was poised for explosive growth, which is exactly what it did from the 1880s into the early 20th century. Showering was not yet a regular occurrence and was largely used for people with specific ailments like kidney problems. The bathtub was the primary method of personal hygiene until the mid-20th century, when American tastes began to switch toward showering rather than bathing. In their heyday, clawfoot tubs began to get more varied with greater options and designs to accommodate their ever expanding market. New sizes and shapes came on the market quickly as more manufacturers jumped on the bathing craze. In the next section, I’ll cover the different styles that were in vogue. Clawfoot Tub StylesMost clawfoot tubs can be classified into five distinct styles. There are slight variations and size options in each style that can create a slightly different feel for each unique tub. See if you can determine the type you have! ClassicThis standard rolled rim clawfoot tub has a flat end with a drain and faucet on one side with a rounded end on the opposite side. It fits nicely with the flat side up against a wall and comes in multiple lengths to accommodate smaller bathrooms or smaller people or larger tubs that can fit a 6′ plus person comfortably. The classic style tub allows an easy addition of a shower to one end of the tub so you can have your cake and eat it too. Double EndedThe double ended clawfoot tub looks very similar to the Classic style but rather than having one flat and one rounded end, it has two rounded ends. This almost always results in a tub design where the drain and faucet are located in the middle of one of the sides of the tub. This style is better set in the middle of the wall rather than up against the wall and are more comfortable for bathing (especially for *ahem* two people!) The central location of the faucet makes setting up a shower a little less conducive. SlipperI’m not sure if the name comes from the fact that this tub looks a little like a slipper or because one side looks like something you can slip right down into the tub from, but the slipper is a popular style that adds a little flair to the standard clawfoot tub. On a slipper tub, one side of the tub is flared up and out to make it more comfortable for soaking. Like the Classic style, this tub has the drain and faucet at the foot of the tub, making it a good option to put up against a wall or add a shower to. Double SlipperWhy have just one slipper when you can have two, right? The double slipper adds that fancy little flare top to both sides of the tub and just like the Double Ended tub, it moves the drain and faucet to the center of the tub on one side. This one is for ultimate luxury and soaking with your favorite partner! PedestalOkay, so, this one is not technically a clawfoot tub, but since it is so close and often included in this family, I felt it needed mentioning. The pedestal tub is usually either a Double Ended or Double Slipper style clawfoot tub with the feet removed and placed on a solid pedestal base. 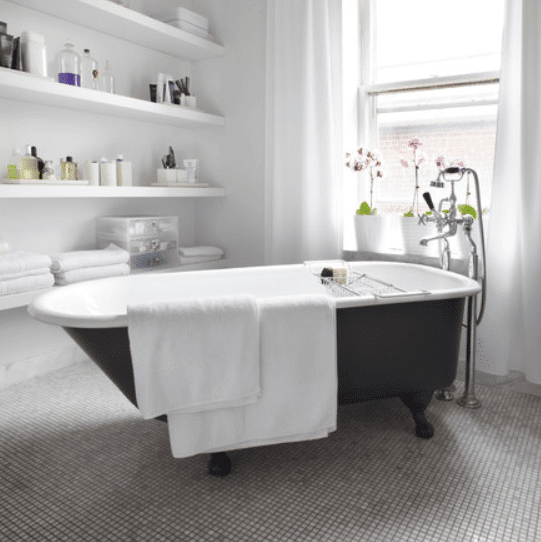 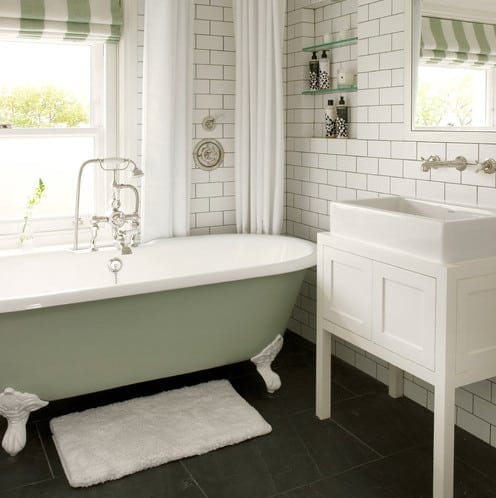 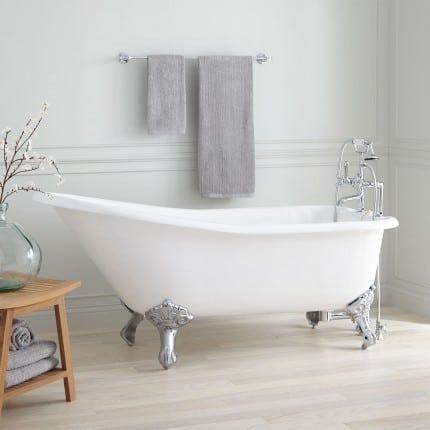 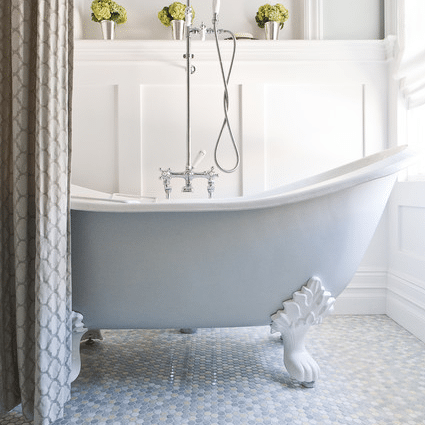 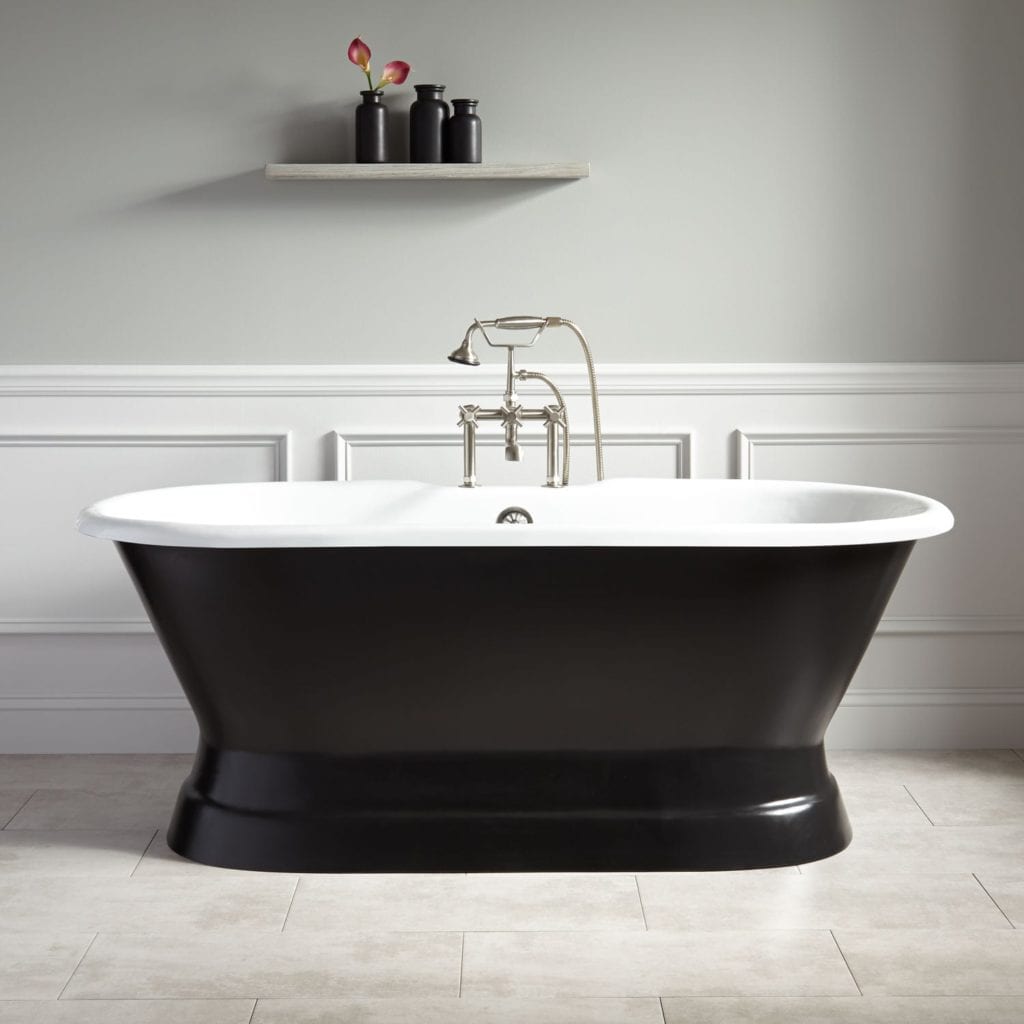
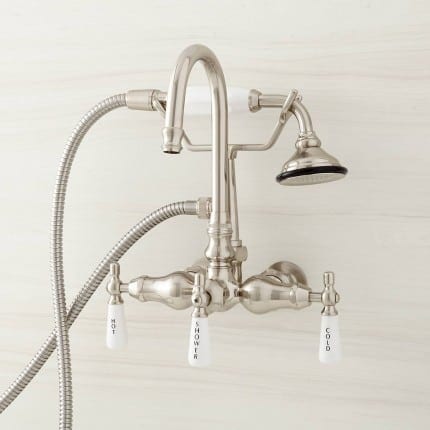
Clawfoot Tub MaterialsAren’t all clawfoot tubs made from cast iron and porcelain? Not so much. Sure, that is the most popular option, especially historically speaking. Nowadays, new materials have been introduced to make tubs lighter and less expensive as well as provide greater variety. If you’ve read more than one post on this blog, you can probably guess how I feel about going with a lesser quality product, but I’ll let you make up your own mind if you are shopping for a new tub for your old house. Porcelain on Cast IronThe classic, and still my favorite, is the traditional porcelains enamel coating on a cast iron tub. It is extremely resilient and long lasting, and the finish can easily be restored again and again through reglazing, which I’ll discuss a little later. The bad news? Cast iron tubs are heavy and difficult to move. The good news? If you’ve already got one in your house, it can be restored for much cheaper than buying a new tub and you don’t have to move it! One more thing about cast iron tubs is that they don’t flex or move when water (and people) are added to them. This isn’t as big of a deal with clawfoot tubs as it is with built-in tubs, but there is something to be said for having a steady, well-built tub that will last a couple centuries. AcrylicWhy would you choose an acrylic tub when you could have cast iron? There are a few reasons. First, acrylic tubs are much more affordable that any other material. Second, they are super light and easy to move. This light weight can also be a huge help when installing it on the second story of an older home that may otherwise have required additional framing of the floor assemble to accommodate a weighty cast iron tub. CopperIf an all white bathroom isn’t your thing, a copper tub (usually a pedestal) might be the perfect fit for you. It is is both historically accurate for pre-1920s bathrooms and very popular right now. Most are sealed to keep the copper from turning green with use, but keeping it clean is important as it can show wear in different ways than a porcelain tub. Repairing & Restoring Clawfoot TubsOne of the great things about old porcelain clawfoot tubs is their ability to be restored and repaired. Small chips can be fixed easily by any DIYer or homeowner with patching kits that are readily available. I posted about how to use some of these DIY repair kits here so you can see the process. For rusted or seriously worn tubs, it’s best to have a professional reglaze your tub. The materials the pros use are head and shoulders above what the rest of us can do. Don’t go buy white enamel spray paint and think you’ll have an attractive tub again. The reglazing process is usually done on site without having to remove the tub and is finished in just one afternoon for around $300-$400. A reglazed tub can last a good 10 years with little care other than regular cleaning before it needs to be reglazed again. The great thing about the process is that it can be done again and again as needed to extend the life of your tub indefinitely. Clawfoot Tub FixturesI’m not gonna lie, trying to include all the options of clawfoot tub fixtures in this blog post is impossible. You could fill a catalogue hundreds of pages long with the different styles, but I wanted to give you some of the major categories for reference so that you can start asking for the right stuff when you do Google searches and talk to sales people. Below are the major types of fixtures you may be considering for your clawfoot tub. Mounting TypeThere are traditionally three different styles of faucet mounts for clawfoot tubs. Each of these have scores of different finishes and design, but they will typically fall into these three categories.
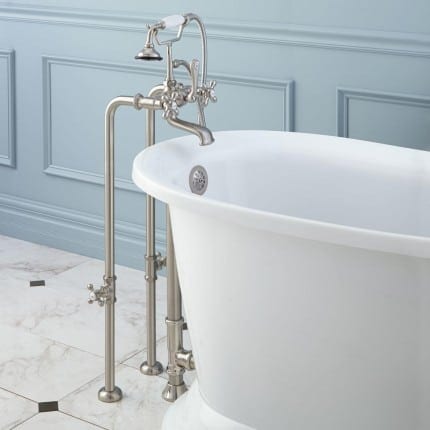  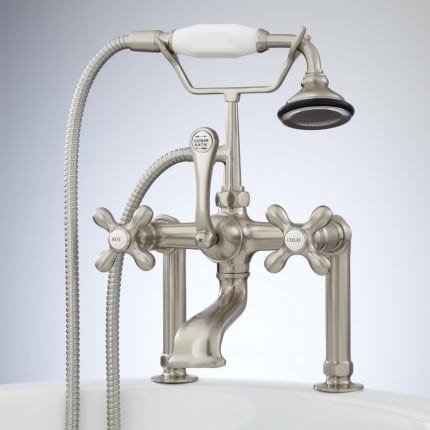
Faucet TypeThere are two main style faucets for most clawfoot tubs. Both can be adapted to replace the handheld shower receiver with a shower pipe and shower head if you wish to have a more traditional shower experience.
ConclusionWhat the conclusion? Clawfoot tubs rock! Seriously, they have been around for well over a century and have proven themselves to be the king of the bathroom and in my opinion the pinnacle of tub design. They may not always be the most practical tub, especially if you are planning to age in place since getting in and out of a clawfoot tub requires a good deal more flexibility than a zero-clearance shower stall, but the gorgeous design has rarely been challenged. If you’ve got an original clawfoot tub, then consider keeping it and restoring it if it needs. You’ve got a premium piece of history that makes your bathroom something unique and can last for decades more. If you’re looking for a new tub, then take look back at the five different styles to determine which will work best for your bathroom and what your needs are. Also, consider which is the right material for your tub, and if you can always go with the higher quality options since as Ben Franklin famously said , “The bitterness of poor quality remains long after the sweetness of low price is forgotten.” The post All About The Clawfoot Tub appeared first on The Craftsman Blog. from https://thecraftsmanblog.com/all-about-the-clawfoot-tub/ 
Being a DIYer means I have a fairly large amount of tools, but - I don't any tools quite as stylish as this one! VonHaus have recently just launched a whole collection of new rose gold tools, targetted at your average DIYer and Upcycler who want their tools to look as good as their projects. 'Cause let's face it - why shouldn't tools look good? So, I've been sent their new cordless electric screwdriver set to put to the test - and whilst I LOVE the rose gold colourway, I was really intrigued to see how well it would perform as an actual tool. Because obviously, a tool needs to actually work and not just look good. So, first things first - let's talk about the colour. I already said I love it, and I really do. I am quite partial to a rosy-pink, which I'm sure if you've followed me for a while (particularly on Instagram), you might know. Although I have to say, I wouldn't quite describe the body as rose-gold so much, but more of a very light nude-pink. The colour is subtle, in a good way and it looks sophisticated. I think one of the worries with having a pinky coloured tool is that it could appear a little child-like and almost fake. But, I'm pleased to say this doesn't. 
So it comes in this clear case, which I really like - I feel as though it's been designed to show off the tool, even when it's not in use. All the other tool cases I own are stored in basic black fabric bags, which I then have to open each time I'm looking for a tool - cos they all look the bloomin' same! This is stand out, different and almost makes a tool-shelf trendy. I mean, I may need a few additional pretty tools to go with it, but I love that's it's eye-catching and it looks gooood. 


So the case isn't just to stylize your shelf with, it's super practical for storing all the different screw-bits it comes with as well, and there's a whopping 50 of them! I'm pretty sure I now have every single one I could ever possibly need. But I also like the fact they each have a 'slot' to fit into and keep them organised, unlike other storage items I have where they'd be rattling around in a loose tin. (Yes, this drives me NUTZ). 

So, let's talk features, 'cos looks ain't everything. Luckily though, this cordless screwdriver definitely doesn't disappoint. It has 15 different torque settings and a drill mode. If you're not familiar with torques, the lower numbers are generally for smaller screws. The higher torque is when you need more 'oomph' to drive in, which is generally for tougher wood and bigger screws. I've used this tool on some long screws already and I'm not going to lie, I had my doubts about how good it was going to drive a screw in - but guess what, no problems! 

Having the torque settings is absolutely fab because some of the cheaper cordless screwdrivers don't have this - which can surely only lead to stripping a ton of screw-heads. Whilst it does also have the drill setting, I do want to mention that isn't a substitute for a drill. You certainly won't get far drilling into brickwork with this, but it will do you fine for plasterboard and softer wood. Changing bits on this screwdriver is super simple as well as it features a quick-release chuck. You simply pull down on the chuck to release and insert new bits. There's no separate tool to wind them in and out like you might find on some older or basic drills. 
My favourite feature though, without a doubt is that this tool can change positions. And by that I mean, it can turn from this, into this... 

Nifty huh? Actually, I can't tell you how bloomin' useful this is. It means you can get into certain spaces better, you can use your weight on it better when required and you can even use it as a manual screwdriver when the battery dies (yep, done that). It's a really clever little feature, that I think, is a stroke of genius. Did I mention how much I like that? 

The other clever little feature is a torch! Yep, on the bottom of the tool is a torch with on/off button. Again, I really like this feature - I've often found myself in dark spots trying to screw something, so I actually think this also going to be quite useful. And of course, you also just use it as a standard torch when you need one too. 
So, my verdict overall, is that it's a pretty good tool. Pretty and good - see what I did there? This might not be the tool for heavy use tradespeople, but for moderate to basic DIY usage, I think it's great. You could easily use this for flatpack, changing knobs on furniture, or just simple DIY building and crafting. It would make a great gift for any new homeowner or DIY hobbyist too. 
The way I've been using this tool personally is in conjunction with our drill. In the past, I would constantly be changing between drill bits and a screw heads on the drill, which is not only a massive faff but a massive time-waster. Having this cordless screwdriver as a side-kick has been a game-changer. I can now just switch between tools, and I don't have to worry about misplacing the bits. I'm expecting to get a lot of use out from this little tool - and I'm sure you'll see it more over on the blog too. If you want to buy this screwdriver or check out the other rose-gold tools from VonHaus, you can find them all on Domu.co.uk. And you can find this particular rose gold screwdriver here, which retails at £19.99. I think it's pretty reasonable value considering all the features and extra bits you get with it - and of course, it's a lovely shade of stylish pink. So, what are your thoughts? Are you swooned by a rose gold tool, too? *The cordless screwdriver that features in this post was sent to me to review. As always, I only recommend products I genuinely like and would buy myself. All words and opinions in this post are my own. Thank you for supporting this blog :) 
from http://www.kezzabeth.co.uk/2018/08/vonhaus-rose-gold-cordless-screwdriver-review.html
There’s a lot of things you need to know when buying any house, but there are a few things specific to an older, historic home that need to be added to your checklist. Before you sign on the dotted line, you definitely want answers to these questions below. 1. Are you in a historic district?Maybe you are, maybe you aren’t, but it’s an important question. Historic districts come with some great benefits, like more stable property values in a bad market and bigger increases in value in a good market. You can read more about property values in historic districts in this post. The other thing to check is that if you are in a historic district, there are likely a different set of rules for what you can change on the exterior of the house. Some districts regulate things as specific as paint colors and others have much less stringent regulations. The point is, you need to know what the regulations and processes are for your district (if you have one) and if you can live with those regulations. 2. Are there local tax credits for restoration?Sometimes you can get very lucky and live in a city where they offer tax credits, grants, or other goodies to folks willing fix up and restore historic buildings. The biggest financial gains usually come if you are renovating a historic building for commercial purposes. For commercial projects, look into the Historic Federal Tax Credit which can pay up to 20% of the costs of your renovation. Money for residential projects is often harder to find, but there are options out there on the local level if you look. Use these incentives to help you create a working budget for your project. If you’re looking for a plan to help walk you through your restoration, try my ebooklet Historic Restoration Plan. 3. What are your insurance options?Who’s gonna write your homeowner’s insurance? Unfortunately, a lot of insurance companies don’t like insuring centuries old buildings, so your options will be more limited than if you were buying a young house. There are insurers who will write policies for historic homes, it will just take a bit more searching. The easiest way I’ve found is by asking friends with an old house who their insurer is, or asking potential neighbors in your new neighborhood who they use. It may seem a little awkward to ask a stranger, but the information can save you thousands of dollars a year in insurance costs to find the right insurer for your old house. 4. Is there lead or asbestos?It’s an old house, so chances are good that there is lead paint, and you might also have some asbestos. Check your seller’s disclosures closely to see what they know first. Then during your inspection period, speak with your home inspector about doing some testing to see what you’re potentially dealing with. The dangers of lead paint and asbestos are relatively minimal compared to the hyper-fear the media and government continues to induce, but you still need to know if you have these hazards and where they are, so that you can plan accordingly. Abatement isn’t always necessary, but awareness is. 5. How are the mechanicals?While old houses can age gracefully, their mechanicals do not. Plumbing, electrical, and HVAC all have specific lifespans that are shorter than your old house. Copper plumbing can last 80-100 years before having problems, electrical systems have improved greatly from knob & tube or cloth covered wiring, and your old boiler may be nearing its last boil. These are expensive elements to replace, and while old mechanicals shouldn’t necessarily deter you from buying an old house you should know what you are getting into and how much it will cost. Do your due diligence. The post Historic Home Buyer’s Checklist appeared first on The Craftsman Blog. from https://thecraftsmanblog.com/historic-home-buyers-checklist/ |

 Architectural salvage can be a godsend when it comes to fixing up an old house. The hard to find pieces and parts that no one makes anymore are all there in bins of old hardware, piles of old moldings, or stacks of old doors. A good architectural salvage yard contains a wealth of history, even if they never seem to be particularly organized. The pieces may be hard to find amongst all the piles, but there is architectural gold hiding in there if you are willing to look.
 Is Hardie trim and siding something that is compatible with the look and style of an old house? I am a relative purist when it comes to restoring old buildings. That largely comes from a desire to make things look the way they were originally intended and a desire to work with quality materials that perform well and last for the long haul. Usually, that means rot-resistant woods and other original materials that would have been on an old house.
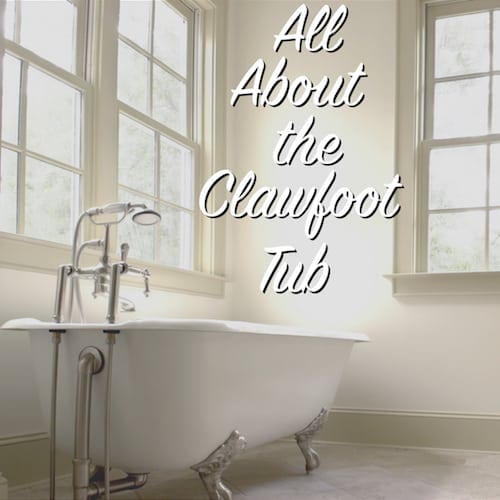 The epitome of of the historic bathroom tub has to be the clawfoot tub. It’s ubiquitous with historic homes and is the central focus of almost any bathroom, since it is usually the biggest element. Some of us are fortunate enough to have the original antique cast iron claw foot tubs that came with our house, but other homes have lost their original bathroom fixtures to the remuddler.
 So, you’re thinking about buying an old house. I don’t mean a 20 or 30-year old suburban tract house, I’m talking a real piece of American history. 100, 150, even 200 years old!
 RSS Feed
