
This is a quick post today, mainly to say thanks for whoever nominated me and secondly I'm just sharing a link if you want to vote.
I started this blog almost five years ago now and I mainly started it because I wanted somewhere to document our old home in all its finished fully-renovated glory before we moved on. I wanted a place I could easily access those memories and a blog seemed like a good shout as I could even add words too. Who knew?! From there, I figured my new blog would be a great place to share progress updates on our new home, week-by-week, month-by-month, to document its transformation. Instagram wasn't really a thing back then and guess what? I didn't even have a smartphone - ha!
The blog has been on quite a long journey since it began. After about a year of writing, I realised people were beginning to find my blog through Google, so instead of writing just for my own memories, I started writing for people who would read it instead. I tried to combine simple updates of the house along with how we were actually doing stuff; what we were buying, how much it all cost, what we did wrong. Things that could potentially help others too.
Now, five years on, I have over 300 odd posts on here. I've *tried* to be consistent (and failed) but the blog has really become part of my life. Creating content on here inspires me to create. I love DIYing even more because the blog keeps it fun, and the more you create, the more creative you become. And I love sharing it with you guys. And for that, I love blogging! On the other side though, blogging is hard work. Every little bit of DIY I do takes about 10x longer because I'm constantly taking photos (often with a tripod - no cameraman here!) and faffing. Then when it's done, I spend hours writing about it. The blog doesn't earn me money so it can be hard to find and put so much time into it. Hence the inconsistency. I love it, but it's hard work. And I'm definitely not very pro at it.
In relation to the *blogging world*, this blog is teeny tiny. I'm absolutely shit at promoting the blog (it makes me feels somewhat narcissistic) and I'm even shitter at reaching out to companies and turning a blog into a business. I'm just pretty shit at that stuff and confidence is not my strong point. But that's OK and these things were never my goal. My only hope from blogging is to simply encourage others to give a DIY a try. Give ideas, spend less, do more. You can DIY with no experience, you can renovate on a budget. And you can create a home out of almost nothing. It takes time and effort, but it's doable. Even if it means living without a kitchen for 18 months. If that's you, I feel your pain!!
Over the last 12 months, I've shared how we fitted our whole kitchen DIY-style, how we transformed a cupboard into a Pantry, how we built Scaffold Board Decking, Pallet Seating, Pallet Fencing, I could literally go on. All created on a budget and 100% DIY. I started this journey of DIYing seven years ago with no experience in DIY whatsoever and everything I know is entirely self-taught. So to be nominated for the AMARA Interior Awards, and in the category 'Best DIY and Home Improvement Blog' is pretty craaaazy. I'm certainly not an expert and not even a great blogger, but I do feel really bloody honoured to even be in there.
You can find my voting page here.
I'm not going to say it would mean the world to me if you voted for this blog and quite honestly, I'm up against some far more professional and just all-around better blogs who are probably more worthy of a vote. But, if you want to vote - I would be very grateful. Having your support in general (I mean someone even nominated me for this award - that's success enough for me!) is more than I could ever have expected from starting a blog. Having a simple shoutout on Instagram or when someone sends me a photo of something they've created, inspired from reading the blog, is the kind of stuff which keeps me blogging. And I honestly couldn't ask for more than that. So really, I should be saying thanks to you guys for motivating me to keep going! Both with the blog and the home renovation.
So thanks for reading over the years, sticking with this long-ass renovation, and thank you SO much for the nomination! I feel somewhat unworthy but bloody darn chuffed. So, thanks :)
Kezz X
from http://www.kezzabeth.co.uk/2018/08/diy-blogger-amara-award-2018.html
0 Comments
When you think of the least energy efficient houses, what time period do you think of? Colonial times? Victorians? Craftsman’s? You might be surprised to find that it’s newer buildings that are the biggest offenders! In one study done by New York City it turns out that a multifamily structure built after 1980 uses 13% more energy per square foot than one built before 1920. Here’s the study. These energy efficiency myths contribute immensely to the mass demolitions of historic buildings and loss of our cities’ history. This misinformation is a problem for both commercial and residential buildings, and that’s where you can help! Read these six myths below, and when you hear someone proclaiming these myths as fact on their social media feed, you can slap a truth sandwich down in front of them by sharing this post. Let’s get to it! Myth #1 Replacing Old Windows Creates Big SavingsI’ve said it before and I’ll say it again. Replacing your original historic windows is not the solution. New windows will save you money on your utility bills, yes, but so will weatherstripping your existing windows. Since leaking air is the biggest issue with window efficiency, weatherstripping and adding storm windows provides a much better ROI than full scale replacement. Think of it this way: If you spend $20,000 on all new windows and you could lower your $300 a month energy bill by a whooping 20% (this is a big number as most reductions are closer to 10-12%) that would save you $60 per month. That means it would take you a staggering 27.7 years to recoup the cost of your new windows! It’s not worth it. If you want new windows, that’s fine, but don’t tell me it’s to save money, because that is a big fat lie. Myth #2 Electronics Don’t Use Energy When Turned OffIn 1978 Americans spent approximately 17% of their electrical costs on electronics and appliances by 2005 that number had jumped to 34%. With all our smartphones, tablets, and other gadgets, I can only imagine that number is well past 40% today. The problem is that these items turn into power hungry vampires when they are off or in standby mode. This “Phantom” load can be as much of 15% of their normal power usage when switched off! Technology is here to stay, but who wants to pay for it when you’re not using it? The best solution is to get an energy saving power strip that stops phantom loading in its tracks by automatically cutting power to appliances when not in use. Myth #3 Closing Vents in Unused Rooms Saves MoneyIt makes sense, right? Close the HVAC vents in unused rooms so you aren’t paying to heat or cool rooms you’re not using. Sounds good to me, but the facts show that it causes more issues than it solves. Closing vents creates unhealthy back pressure on your HVAC system, which causes more wear and tear on the mechanical components, resulting in shorter lifespans and more mechanical problems, and it also causes less efficient distribution of the conditioned air to the vents that are open. Instead, try directing your vents so that they aren’t blowing directly onto any windows or doors and focused into the middle of the room for the most efficient heating and cooling. Myth #4 Setting the Thermostat Cooler Makes the Room Cool Down FasterSadly, your heater and AC function at only one temperature. When it turns on, it blows the coolest or hottest air it can until the thermostat says the room has reached the prescribed temperature. Turn it to the temperature you want and be patient. If you need to get cooler quicker turn on a fan for the time being, which uses minimal energy and helps cool people in the room. Myth #5 Changing Your Thermostat Doesn’t Provide Much in SavingsThis is such a simple thing to do, but the problem is it requires us to act proactively. This applies to the use of your air conditioner and heater. For every degree you turn the heater down in the winter and every degree you turn the AC up in the summer, you save about 10% in energy costs. Since your heating and cooling costs account for approximately 50% of your annual energy usage, that’s a huge savings! Using a programmable, or even better a smart thermostat, can help do this for you rather relying on your own memory. Check out my previous post on How to Install the Nest Thermostat to see how easy it can be. Myth #6 New = Energy EfficienctSorry to say, but new and energy efficient have different definitions. Though the building industry wants us to think that the newest thing on the shelf is always the most energy efficient option, it’s simply not true. When it comes to building efficiency, age is simply a number and has nothing to do with a building’s efficiency. Methods of construction and the condition of the building play a much larger role in a building’s overall energy efficiency than its age. Don’t be fooled by the shiny new objects marketed to you every day. Time tested techniques applied to old houses can make bigger gains than you might expect. Going FurtherNo more energy efficiency myths around these parts! We’ve busted them for good. For more help on improving the efficiency of your old house, try these related posts that are filled with simple DIY improvements you can make on the cheap!
The post The 6 Biggest Energy Efficiency Myths appeared first on The Craftsman Blog. from https://thecraftsmanblog.com/the-6-biggest-energy-efficiency-myths/
This is a relatively similar process to my post about how to build DIY Storm Windows if you are looking to gain some energy efficiency out of your old windows. You’ll need a few basic tools to get the job done and done well, and you can’t be afraid of using a few standard shop tools like a table saw and miter saw. Check out the list of tools and supplies I used below as well as the video for the step-by-step break down of the process. Tools
SuppliesStep 1 Determine the ThicknessScreens were meant to fit on the outside of a double-hung window and rest up against the blind stop. They are usually between 3/4” and 1 1/8” thick. The 3/4” version is extremely common after 1910 and simple since you can just buy standard 1×4 and 1×6 materials to make the screens from, so that is what I’ll cover here. For thicker screens, you have 3 options:
Step 2 Measure the OpeningThe next thing you need to measure are the overall dimensions of the screen (width & height). I measure as tight as possible and then subtract an 1/8” from the overall size. If you make the screens too tight, then with the irregularities and paint build up on old windows, you will be doing a lot of planing and sanding to make it fit. If you measure and come up with 32” x 60” then plan to make your screens 31 7/8” x 59 7/8” to ensure a good fit. Step 3 Cut to LengthYou’ll need (1) 1×4 cut to the height of your window (the 59 7/8” length from our previous example) and (1) 1×6 cut to the width of the window (31 7/8”) minus 3 1/2”. There is a reason for the slight discrepancy and it has to do with the blade width on the table saw. For now, just trust that the rule is correct. You’ll see why soon! You’ll also need enough screen molding to go around the perimeter of the screen and across the meeting rail of your screen. So, for a 32”x60” screen, you’d need approximately 18’. Screen molding or half round is available at most home stores and that’s what you’ll use to give the screens their finished appearance. Step 4 Rip the RailsFrom these 2 pieces of wood, you’ll be able to make all the rails and stiles you need for one full screen. You’ll need the table saw for this next part to rip these pieces to the proper width. Here is the cut list you need:
Step 5 AssembleAssemble the screen frame and clamp everything together so that it is square. In the video, I use a Kreg K4 pocket hole jig and screws to attach the joints because it is one of the most DIY friendly ways to assemble a frame like this. Step 6 Prime & PaintIt’s much easier to prime and paint screens before you apply the screening, so take this time to put a coat of oil-based primer on and coat the frame and screen molding with the high quality paint of your choice. Step 7 Apply ScreeningPick the screen type you want and roll it out across the frame. Start in a corner and begin pulling and stapling the screening tight. You want to staple within the first 1/2” from the inside edge of the frame in order to hide the staples in the end. Step 8 Apply Screen MoldingCut pieces of screen mold to cover the areas stapled earlier and nail it on with 3/4” 18 ga. nails. Miter the corners for an attractive finish. Step 9 Install HardwareTouch up the paint on any nails holes and then apply the screen hardware. I use Stanley Screen & Storm Hangers for my screens and storms. You also need to install a couple simple hook and eyes to attach the bottom of the screen into place and secure it. Enjoy the fresh air a huge sense of accomplishment that your DIY window screen is not only an attractive carpentry project, but one that is extremely practical! The post DIY Window Screens appeared first on The Craftsman Blog. from https://thecraftsmanblog.com/diy-window-screens/ 
I'm super excited to be collaborating with Skylight Blinds Direct on this post today and giving away a £50 voucher to spend on their online shop! Whether you already have a roof window you'd like a new blind for, or you're renovating and have grand plans for putting in new roof windows, this giveaway is for you!
If you haven't heard of Skylight Blinds Direct before, then I definitely recommend checking them out. They essentially create blinds that will fit all major roof window manufacturers. All you need to know is the make or your window and the window code. And if you're not sure, don't worry - there's an easy to follow guide that explains exactly how you can find out! And if you have a very old or bespoke sized window that isn't on their list, then don't worry, they can also create bespoke made-to-measure blinds too! From blackout blinds to waterproof blinds to even motorised blinds, their website offers a blind for every room in a variety of colours and some patterns too. So, if you'd like to bag yourself a £50 voucher to put towards a roof window blind, then all you need to do is fill in your details into the Rafflecopter form below. You can gain several extra entries by completing extra tasks too if you'd like - all the info is in the widget below. The giveaway will be running for 3 weeks, and the winner will be chosen at random, so good luck!!

from http://www.kezzabeth.co.uk/2018/08/win-skylight-window-blind.html
In just a few short years, issues began showing up with this metal being used as the main wiring material in residential construction and it wasn’t long before the industry realized it needed to make some serious changes to the way they used aluminum wiring. In the early 1970s, manufacturers changed to a superior quality alloy for aluminum wiring better suited to use for electrical work, but by then, it had gotten such a bad rap as being dangerous that the pubic wanted no part of aluminum wiring. It is still allowed in most local building codes, but rarely used. Problems With Aluminum WiringAccording to the Consumer Product Safety Commission (CPSC), “Homes wired with aluminum wire manufactured before 1972 [before the upgraded alloy] are 55 times more likely to have one or more connections reach “Fire Hazard Conditions” than is a home wired with copper.” That’s crazy! Aluminum is not as good of a conductor of electricity as copper, and so larger diameter wires were needed and it generated more heat than copper. Excess heat caused home fires and that’s why people got so scared of aluminum wiring. Below I’ve listed some of the issues with aluminum for use in electrical applications:
Fixes for Aluminum WiringWhile expensive and intrusive, rewiring your house with copper will of course resolve your issues to the point you’ll never have to worry about them again. But there may be some better and more cost effective options below to keep your house safe if you do have aluminum wiring from the danger period of 1965-1973. No Push-In ConnectionsLike I talked about above these type of connections should be avoided at all costs when it comes to aluminum wiring. Always attached receptacles, switches, or any other fixtures by wrapping the wire around the screw and tightening it down. This will ensure safer connections throughout the house. Special ConnectorsSince the biggest issue with aluminum wiring is at connections, there were special connector designs for aluminum wiring. Don’t just go to the hardware store and pick up a standard outlet and think you can safely install it. It must be marked specifically that it is safe for aluminum. Below is a list of items that are safe for aluminum wiring. If in doubt, ask one of the salespeople at the store to confirm that your choice is indeed made to work safely with aluminum wiring.
What About Insurance?A lot of folks have trouble finding an insurance company that will insure a house with aluminum wiring. If that is your situation, then you may have to do some serious shopping around. Some companies ask and others don’t ask. My advice would be that if they don’t ask, then you don’t tell. You can find insurance companies that will insure your house, but just like a lot of old houses, some companies will write you off as undesirable. Don’t get discouraged, just keep looking. If you have aluminum wiring, I don’t think you need to have it replaced, but you definitely need to take some extra precautions to keep your home safe. The post Is Aluminum Wiring Dangerous? appeared first on The Craftsman Blog. from https://thecraftsmanblog.com/is-aluminum-wiring-dangerous/ 
I can't believe we've been living in this house for four years already! It seems absolute madness and in many ways makes me realise how far we haven't come within our home renovating journey. I mean, four years and we're barely halfway through?! But I guess that's the reality of DIY renovating and renovating on a serious budget. Tough life, eh?
Despite being far from finished, over the last 12 months, a lot has happened. We've finished the kitchen entirely (well, 95% finished - but that counts as finished right?!), we've finished the dining room entirely (well, 95% again) and we've made tons of progress in both the conservatory and the living room. Not to mention the garden has changed quite a bit too. So, that's five different areas of the house in 12 months - not bad! And, I think this is the first year the house is actually beginning to feel and look like a home.
So, this post is basically going to be a kind of 'up-to-date house tour' showcasing where we're currently at in our home reno journey. I do this post every year, so if you want to see how our journey has unfolded year on year, you can check out each of these posts for the last four years right here:
Year 3 Update (Last Year)
So let's start at the beginning, shall we? I'll walk you through the house, in the order of the rooms, you would meet. I haven't styled any of the rooms for this shoot, what you see is what you get (sorry!) and it was on a bit of a dark day (mistake!).
The Hallway
This room is unchanged as ever! Actually, we anticipate this will be the last room we possibly ever tackle, so it's barely changed in four years and I don't see it changing much any time soon. But I mean, it's not that bad, right? *said through gritted teeth*


The Living Room
This room has gone through quite the transformation this year. I've sanded floorboards, stripped wallpaper, repaired the ceiling (ish) and bought a whole new secondhand sofa. Let's just say this room is probably the most changed room over the last 12 months. We've taken a break from it for the summer, but we hope to finish it later in the year! If you want to see all the progress made so far, you can find all my living room posts here.


The Kitchen/Diner
Last year at this time, we only had half a kitchen. We still didn't have a working sink, a proper tap, or a worktop along the right-hand side of the kitchen. We basically had run out of cash and had to wait to save for the last missing piece. A whole year on, it's DONE. OK, the hanging lights are still out of place and we still don't have shelves - but other than that, it's done. And it feels good! You can see the full kitchen tour here.

The dining room is also finished, albeit with a plug and light switch still hanging out the wall. But it's done, it's furnished (although I desperately want to build a new table) and it's a room that's finally nice to be in. For three years, this was just a space we walked through; it lacked purpose and we never had somewhere to sit when we ate. Oh, how life has changed in the last 12 months! I've almost forgotten those days... almost.

Conservatory
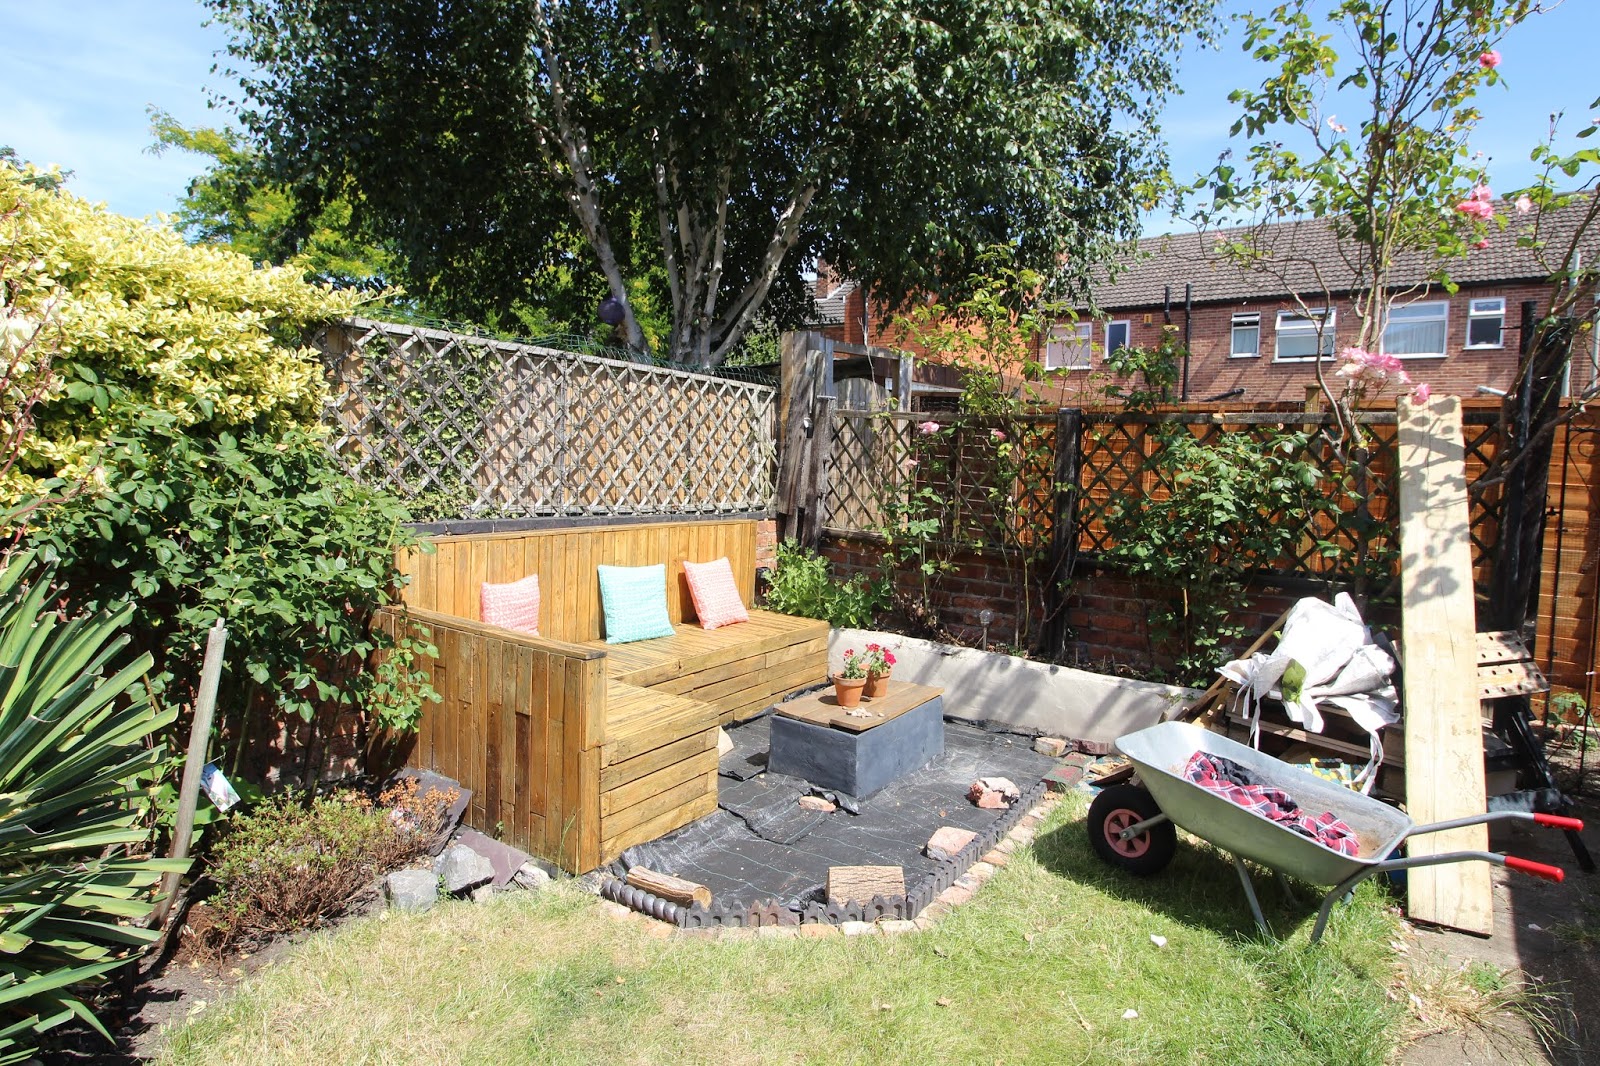
Well this room has also undergone quite the transformation! Last year I painted the floor on a whim since we had zero budget and I felt like we needed to up the pace of renovating a bit. It's definitely added a punch of character and it's held up pretty well for the most part too. The only issue we've had with the painted floor was during the change from colder to warmer weather, which has lifted up some paint near the air vent - but luckily you can't see much of that. More recently, I've built the pallet seating in here too, which I had been planning for YEARS! And my vision of a garden room conservatory with plants galore is finally taking shape. There's still much to do in here, but I'm really pleased so far.

The Basement
The secret room I very rarely talk about! I am so desperate to get my paws working down here. But, it's going to be expensive and we currently have no money. We have ventilation issues we need to sort out, and I don't want to rush into anything and make the wrong decision. So far, I haven't researched enough to begin work down here - so it basically looks exactly the same. Well, aside from the stack of pallets mounting up. I'd like to start sooner than later with work down here, but we'll see...


The Landing
Another room that totally hasn't changed. We even still have stuff in moving boxes from 4 YEARS AGO. Seriously when does it end?

Bathroom
This was the first room we ever tackled and it doesn't look too different now. I'd love to update this room a little because we never quite got round to the 'finishing touches' stage and it feels a little empty and unloved at times. I'm also not digging the cream walls and we STILL have skirting boards missing in places and a cupboard without a door. But, meh. We have a place to shower and pee, that's what counts right?

Smallest Bedroom/Office
We use this room as an office, although it doesn't actually see that much use. It hasn't changed at all this year really. Again, I'd love to furnish it better - but there's never the money for that. The negatives of forever renovating eh?!

Master Bedroom
Four years on, and this room is another one that's completely the same! From the curtains to the floor, we're still rocking dear old Edna's retro style. Will it be on the to-do list for next year? I kinda hope so. It would be nice to one day not wake up amongst this dark mess!

Attic
At the start of this year, we got rid of SO much rubbish from up here. Stuff we'd been keeping *just in case* - but we had kept it long enough, it needed to go. We burnt a load of wood in the wood burner and took a load more to the recycling centre. It still doesn't look tidy or empty, but it's a great deal better than what it was. This room isn't a high priority on our list, although it definitely need attention sooner than later.


Garden
I've been tackling the garden since day one of moving in! It looks SO much different to how it looked when we moved in and it even looks different from how it did 12 months ago. We've added decking, gravel, fencing and the rubble is almost gone. 4 years of work out here is beginning to pay off. We're not finished yet, but the end is certainly in sight. And we're hoping to have this area ticked off the to-do list by the end of next summer!


So that's the house in 2018, and our four-year houseiverasy update. Yes, I wish we had achieved more - but that's probably always going to be the case. And I think this year has been quite a good one, so I feel good about that. Here's to another year of hard work, ha!
Anyone else on the same long renovation journey out there?! Please come forward and make me feel better ;)
from http://www.kezzabeth.co.uk/2018/07/4-years-on-our-home-reno-update.html
Nobody likes a sticking door, but the tricky part about fixing this issue is that if you trim too much off, you may end up with a drafty door that has gaps arounds its perimeter in the winter. So, how do you know how much to trim and where? I’ll show you in this post below, so just keep reading! Step 1 Find the Problem AreasThe first thing you have to do find out where the rub is. The easiest way to do this is look for spots on the jamb or sides of the door where the paint is rubbing off. Slowly open and close the door and look for trouble spots as to where it is rubbing. Mark those spots lightly with a pencil so you know where to trim. Be sure to check all around the door for an even gap when closed. In the summer months, you should have about a 1/16″ gap all around the perimeter of the door. In the winter 1/8″ or 3/16″ may be more common. If the gap at the hinge side is too big, then check out Step 2. Step 2 Check the HingesMaybe your door isn’t swollen at all. Maybe you’re lucky and it’s just a problem of the hinges coming loose. Check to make sure all of the screws on the hinges going into the jamb and into the side of the door are tight and haven’t come loose. This is an all too easy fix. If you find some loose screws, then remove the offending screw and take a splinter of wood, add some wood glue to the end of it, and cram it into the screw hole. Break of the part that sticks out and let it dry. Once that glue is dry, you can reinstall your screw and it should hold tight. If it’s a mater of needing to bring your hinges back further into the jamb, then remove the hinge and using a chisel, pair down the hinge mortise a little bit more, which will bring the door closer to the hinge side of the jamb. Step 3 Sand Down the ExcessIf the areas where your door is sticking are along the side where you can access them without removing the door, then you’ve got things a little easier. Locate all of those pencil marks that you made earlier and using either a block plane or sander (I prefer a belt sander) sand down the high spots until the door closes smoothly. If it’s a bigger issue than just a few high spots, then ripping the door in Step 4 may be a better solution. Caution: Don’t over do it!! Sand the door just enough that it will operate smoothly or else you will be left with big gaps in the winter. Remember, the summer is when your door will be the biggest, so we want it to just barely close and open at this point. Step 4 Ripping the DoorIf the bottom of your door is rubbing on the floor or there are too many areas to smoothly sand down, then there is no way to resolve that other than to remove the door and rip down the problems sides. Setup a couple saw horses and using a Spring Set tool or flat head screw driver, pop the hinge pins out so that you can remove the door for trimming. I wouldn’t recommend just freehanding a circular saw to make your cuts because you’ll almost certainly end up with a wobbly cut. For trimming doors like this, I prefer to use a Kreg Accu-Cut jig so you can get a perfectly straight cut. The jig only cuts a maximum of 48″ so you won’t be able to cut the entire side of the door, but that is rarely necessary. With this jig, you can always trim the bottom or top of the door with no problem. This jig attaches to almost any circular saw and makes getting a straight cut easy. Check out the video below to see how it works! Finishing UpOnce you test the fit and have your door operating smoothly, make sure to prime any bare wood that resulted from your modifications with an oil-based primer. Bare wood will pull in moisture quicker than if it is sealed with a primer and you’ll be back in the same sticking door scenario again if you don’t prime it. Keep an eye out for little tune ups- you may need to make to the door throughout the season and make any changes you need until that sticking door is a thing of the past. The post How To: Fix a Sticking Door appeared first on The Craftsman Blog. from https://thecraftsmanblog.com/how-to-fix-a-sticking-door/ 
If you've followed me for a while, you'll know I've never had much desire for gravel in the garden. Don't get me wrong - I don't hate gravel and there's certainly a time and place for it, but after having an entire yard full of gravel in the old house (full garden tour here), I was against doing the same this time around. And for a long while, I was pretty adamant about that. Sadly though, our budgets aren't big enough for my dreams and now we've lived in this house for four years (yes, FOUR years), I'm beginning to realise I need to adapt some of my hopes and dreams and reign them in a little. I mean, none of our plans are insanely expensive, but they could always be cheaper in some way or another. We've now been working on our garden renovations since we moved in, back in 2014. I ripped apart the entire garden in a matter of weeks; and since then we've transformed it with a new lawn, a pallet sofa with firepit, scaffold decking and most recently, slat fencing. (You can check out all my garden reno posts here) But as a whole, the garden is still far from finished and the biggest eye-sore has been the old concrete path that runs the length of the garden. 
The plan was initially to use part of the path as a lower-patio against the decking for a sit-down area of table and chairs. Then, reduce the width of the rest of the path for a wider lawn instead. I had always envisioned some beautiful dark limestone slabs, but, the cost of this would have been insane. Spending that much money just didn't seem right when half our house is incomplete, and despite my best interests of finding something cheaper, or secondhand, it just didn't happen. So - along came the idea of gravel. Gravel requires little-to-no extra materials, it's inexpensive to buy and can make an instant transformation in a matter of minutes. The negatives, however, are that the dogs are likely to kick it all over the place, it's not an easy material to sweep leaves and other debris from, and you obviously can't walk on it barefoot (oh first world problems!). But, after searching the hashtag #gravelgarden on Instagram for hours, I was completely sold on the idea. Especially as we could buy a large bulk bag and use the extra around the pallet seating corner too, which has been unfinished for the last 3 years. The positives far outweighed the negatives, and it just made sense. So that's what we did. Here's a couple of 'before' shots.. 

Choosing a GravelThe gravel we used in our old house was Cotswold Chippings, which is a fairly consistent shade of light cream and has quite a modern feel to it. Despite really liking them, they did go a little green in places over the winter and I wanted to do something different in this house anyway. This time around, I wanted something with a more mix of colours to it, but at the same time still light and modern.I found a few websites that offered gravel samples, but the one that stood out as the most affordable (some websites wanted to charge £5 per sample, would you believe?!) along with reasonable prices for bulk bags and delivery, was The Stone and Garden Company. I ordered two samples to keep my choices minimal and I eventually decided on 20mm Yorkshire Cream, which is shown as B in the photo below. The other one in this photo is a 20mm Quartz. 
Fitting Gravel Board and Edging TilesThe first step to gravelling the garden was to fit some kind of edging around both the pallet seating corner and lower-patio area so that the gravel would be partitioned from the grass. The last thing we want is gravel all over the lawn (and the dogs are certainly prone to kicking it about!) so a good edging will help against that.For the pallet seating corner, I re-used some of the original Victorian Edging tiles that were in the garden when we first moved in. Some of them aren't in the best condition and I've had to mix and match slightly, but I figure it all adds to that period charm. I've also used some leftover bricks with them too, just because I like the look of it. I think it works and looks really good! 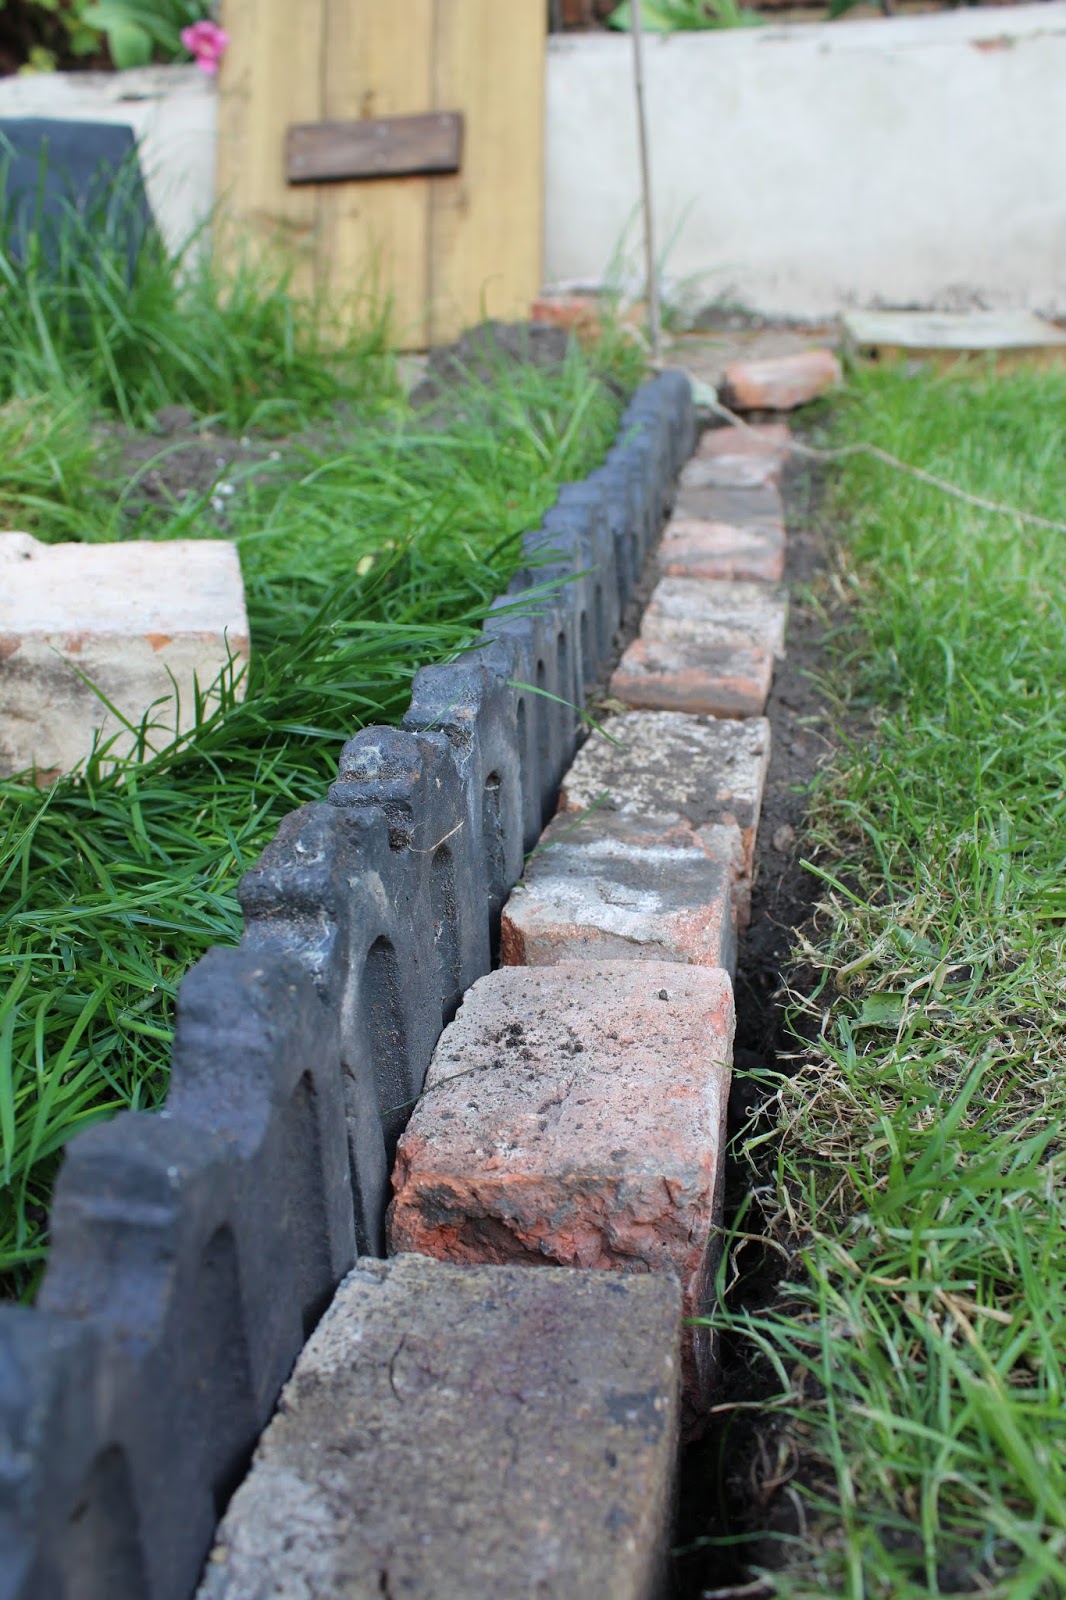
I'll give you a quick talk through the process, but it was seriously simple. Like, zero DIY skill involved. 
I laid the bricks out in the rough shape I wanted to create, then used a string line to properly mark it out. A string-line will help to keep you keep going straight when it comes to putting it all together. 
Then, I simply dug a trench to slot both the edging and bricks into. Simple!


Finally, I back fitted the gaps with mud and voila, one reclaimed brick edging! 

Not bad huh? As for the patio area, I wanted something a little less decorative, so I decided to use a gravel board instead. It's super cheap and once fitted is barely noticeable. I fit the gravel board in exactly the same way, digging a trench and slotting it in. Super simple, although both areas did take a couple of hours to do. 
Laying Down Landscaping FabricI see so many people just chucking gravel down willy-nilly here and there and in a matter of weeks, weeds are popping up all over the place. You can lay gravel down on-top of anything, but if you want a decent finish that won't turn into a weedy-hell, you do need to prepare the area first.If you're laying gravel onto soil or cracked concrete where weeds may grow, I thoroughly recommend using landscaping fabric underneath first as this will completely block out the light to them. We always use the heavy-duty stuff because it's far more durable, which is really important when using under gravel as normal weed fabric will tear and rip apart within a matter of weeks. And don't worry - it's completely permeable so it won't turn into a swap either. You can peg the fabric down into the soil if you'd like, but otherwise, the gravel should hold it into place, so all you need to do, is cut to size and lay. Here's Doug modelling it fabulously. 

Laying the GravelWe ended up ordering an 850kg bulk bag of Yorkshire Cream gravel from The Stone and Garden Company, as I mentioned earlier, for only £85 (and including free delivery would you believe?!) which meant we had a lot to sift through. Since our garden also has no access for pallet wheels, we had to have the bag delivered to just outside the back gate, on the adjoining road.So, we borrowed a wheelbarrow from Grants parents so we could easily transport the gravel from the bag to the garden, without taking years to do. We used a spade to fill the wheelbarrow up and then simply dumped the gravel where we needed it. 


I then used a scrap piece of wood to spread it around and make sure it was all fairly level. Our concrete is actually on a slope, so we've worked with that. 
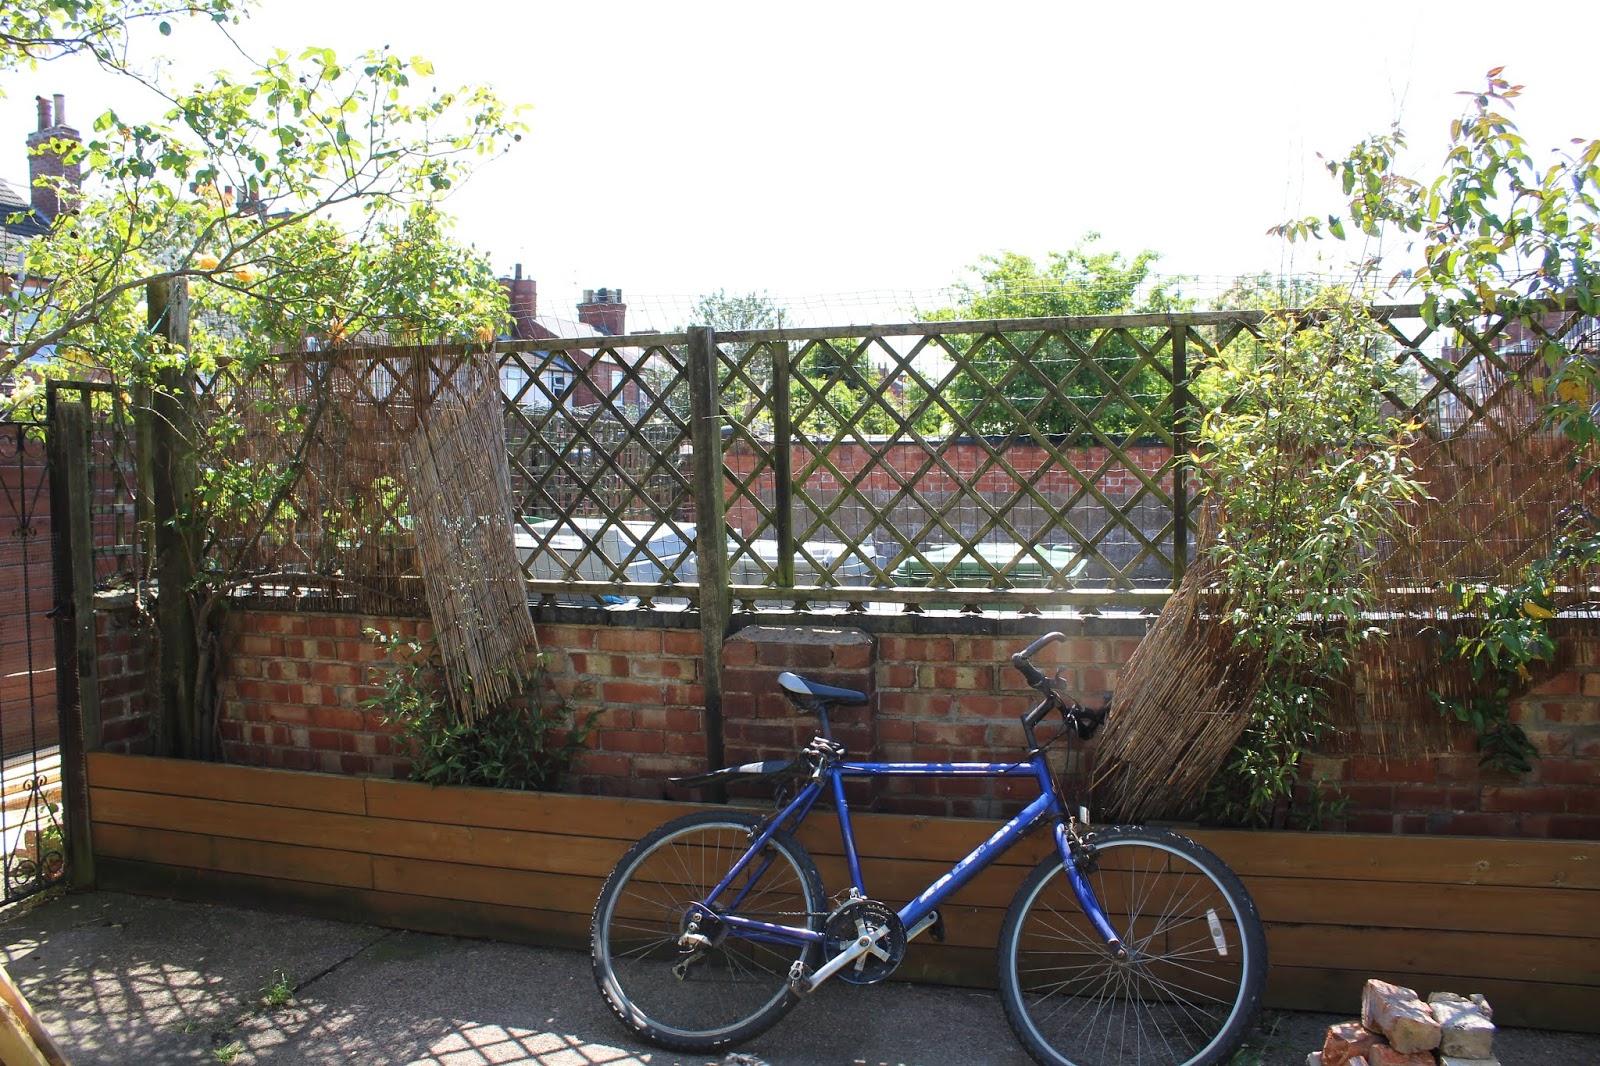
We had so much gravel leftover, we even managed to add some to the back alley as well. This was something we had planned to do eventually, but we never expected to get it done with this single bag alone! Again, we have cracked concrete here so I laid out more landscaping fabric and simply dumped the gravel on top. Oh and I used more bricks to create an edging here too - they're not mortared into place (wouldn't be worth my time or money!) and some are a little rough and ready in places, but I think it looks good! Here's a before and after: 


For years this alley has been used as a dumping ground, so laying gravel here has made even more of a transformation than it has in the garden! Grant uses this alley almost daily for his bike, so it feels good to finally have it cleared out and prettied up. We plan on adding some solar fence lights in the future (Lights.co.uk have some particularly affordable ones I'm eyeing up!) and painting and repairing some of the fences too. But the later is probably a job for next year! Washing the GravelAfter we had laid the gravel, we needed to hose it down for its true colours to be shown. Bulk bags of gravel are usually quite dusty, so this covers the gravel until it's washed away. Here's a couple of photos for you to see the difference:

A Finished Look!And that's it! It really is that simple. So here are some finished pics for you to look at...


I am dead chuffed with how it looks, and I think it works really well. Sure, it's no limestone paving slabs - but you know what, I think it's a good rival! So, Would I recommend Gravel? OK, so cards on the table. The dogs have kicked it into the grass twice so far (UGH!) and twice already leads me to believe it will happen again, and again. So yes, that is flipping annoying and one of the biggest negatives to gravel. The pallet seating corner is already beginning to stack up with leaves and petals from the rose bushes which obviously I can no longer sweep away and will it soon turn into a leafy mess-pit I can't control? Only time will tell. And lastly, let's talk about the neighbourhood cats. Someone on Instagram warned me that cats love to use smaller sized gravel like a litter tray. I took note and avoided shingle type gravel - this one has much larger chunks within it. But guess what? I've already cleared up three lots of cat poop from the back alley! And it's certainly is not from the dogs, so yes, that is also another huge negative. I mean, who really want to pick up more poop?! BUT, all things considered, yes I would definitely recommend gravel. After all, if you're on a budget, it's the most budget-friendly quick-solution out there. There is literally zero hassle when it comes to installation and it's so bloody affordable! Let's face it - there's a reason we've used gravel twice now. I'm definitely pleased with it - I personally think the positives outweight the negatives, and you know what, if I ever can afford those limestone paving slabs for the lower-patio one day, this won't have been the biggest waste of money. We just need to sort out the rest of the path now... but I reckon that might be a job for next year. Watch this space! Costs (rounded to the nearest pound) New Tools Purchased: None, although we borrowed a wheelbarrow. Materials Used: Gravel Board x2 - £4 Landscaping Fabric - £20 Yorkshire Cream Gravel - £85 Total: £109 Other Items Featured: Parasol - IKEA Table & Chairs - Argos Lantern Lights - Last year, Lidl Outdoor Cushions - Homebase from http://www.kezzabeth.co.uk/2018/07/laying-gravel-in-garden.html
I wanted to stack up some basic wood fillers against some high end epoxies and see how they would do in the worst case scenario under the most brutal Florida conditions with intense sun and drenching rains all summer. At year four, the wood is beginning to deteriorate quickly and I’m beginning to wonder if my patches will outlive the wood they have called home for these last few years. Check out the results and pictures below to see how each patch has faired. The five products I tested here are Abatron WoodEpox, MH Ready Patch, JB Weld KwikWood, Minwax Wood Filler, Minwax High Performance Wood Filler. The Test ConditionsTo make this test as scientific as possible, I’ve outlined the rules and conditions below. I drilled out a 1/2″ deep hole with rough edges to try to simulate a chipped or gouged board and filled the hole above the surface with filler, after which, the patches were sanded level. Here are the conditions:
All of the fillers and epoxies were applied and left to cure/dry until they were ready to sand smooth. I ranked the fillers in my original post regarding ease of application, ease of sanding, and drying time. The sample board was left outside uncovered laying horizontally. I will qualify this by saying that all of these manufacturer’s recommend that their products be primed and painted even though I have left all of them without any primer or paint. This test will clearly show different results than if I had painted the repairs, but I decided that seeing how a product would stand up to unprotected exposure and on a horizontal surface would show results more quickly and accurately as to which product has the greatest staying power. Check out the previous years’ posts below to follow the progress of the fillers:
WoodEpoxProduct Info: 2-part epoxy filler Test Results: Year four has brought minimal changes to the WoodEpox. The cracking around the perimeter of the patch is about the same size as year three where it runs parallel to the wood grain, but where the patch is against the end grain of the wood it has held up better. I can only assume that is because there is less movement of end grain versus edge grain. No discoloring unlike in previous years and less algae growth as well, but, I have come to believe that is just depending on the amount and frequency of rain we get here. Even the little nail hole patches have held strong and refused to be pushed off the wood surface, which is a positive indicator to me. The patch still feels firmly adhered to the wood and does not move when handled. Ready PatchProduct Info: Spackling Compound Test Results: In year four, the perimeter cracking has stayed about the same with roughly 95-100% of the perimeter separated from the wood. The patch is still solid to the touch and does move much, if at all, when prodded. The one notable change in the patch this year has been that the surface has become rougher, which explains the brownish color compared to other years. It now has a gritty feel comparable to 220-grit sandpaper, whereas in past years it has been smooth. KwikWoodProduct Info: 2-part epoxy filler Test Results: KwikWood honestly still looks like it did the day it was installed. It must have some self cleaning system I’m not aware of or my kids go out and wipe it off every week. The cracks around the perimeter are still very minimal and the patch doesn’t move when touched. For large repairs, this product isn’t particular feasible since it is expensive and come in small containers, but for small spots like this, I’m definitely a fan. The surface is also smooth and flush with the wood surface around it. Minwax Wood FillerProduct Info: Water-based wood filler Test Results: Once again, the darkhorse of this test doesn’t disappoint. With the least cracking around the perimeter, this basic wood filler has really blown me away that is has performed better than the high end epoxies. Granted, this is not a structural epoxy and could never perform the kind of tasks required of WoodEpox, but for basic hole filling, why would I not use this? The surface is a little gritty like the Ready Patch, which would make it stand out underneath a coat of paint, but other than that, this filler is rockin’ and rollin’! Minwax High Performance Wood FillerProduct Info: 2-part styrene/resin filler Test Results: The cracking around the perimeter of the patch has almost completed itself here with about 95-100% separated especially along the edge grain of the wood. Much like the Kwikwood, the surface of this resin filler (which is a similar makeup to Bondo) remains clean and free of any algae of mildew. The patch still feel firm in the wood with little to no movement. This patch has also had the very small chip size patches that surround it hold on to the wood and not fall away. Final ThoughtsIt seems that in year four, just like year three, there were minimal changes. Most of the big changes were in the first couple years with the perimeter of the patches pulling away from the wood and then there have been a couple years of stabilization. This year, the biggest changes seem to have been to the Ready Patch and Minwax Wood Filler surfaces with textures getting rough. We’ll have to see if that means next year we’ll find more seriously degrading materials. If you have found this test helpful consider purchasing any of these wood fillers by clicking any of the links on their names through my Amazon affiliate links to help support the blog. It costs you nothing, Amazon just gives us a little commission for sending you their way. The post Wood Filler & Epoxy Test (Year 4) appeared first on The Craftsman Blog. from https://thecraftsmanblog.com/wood-filler-epoxy-test-year-4/ 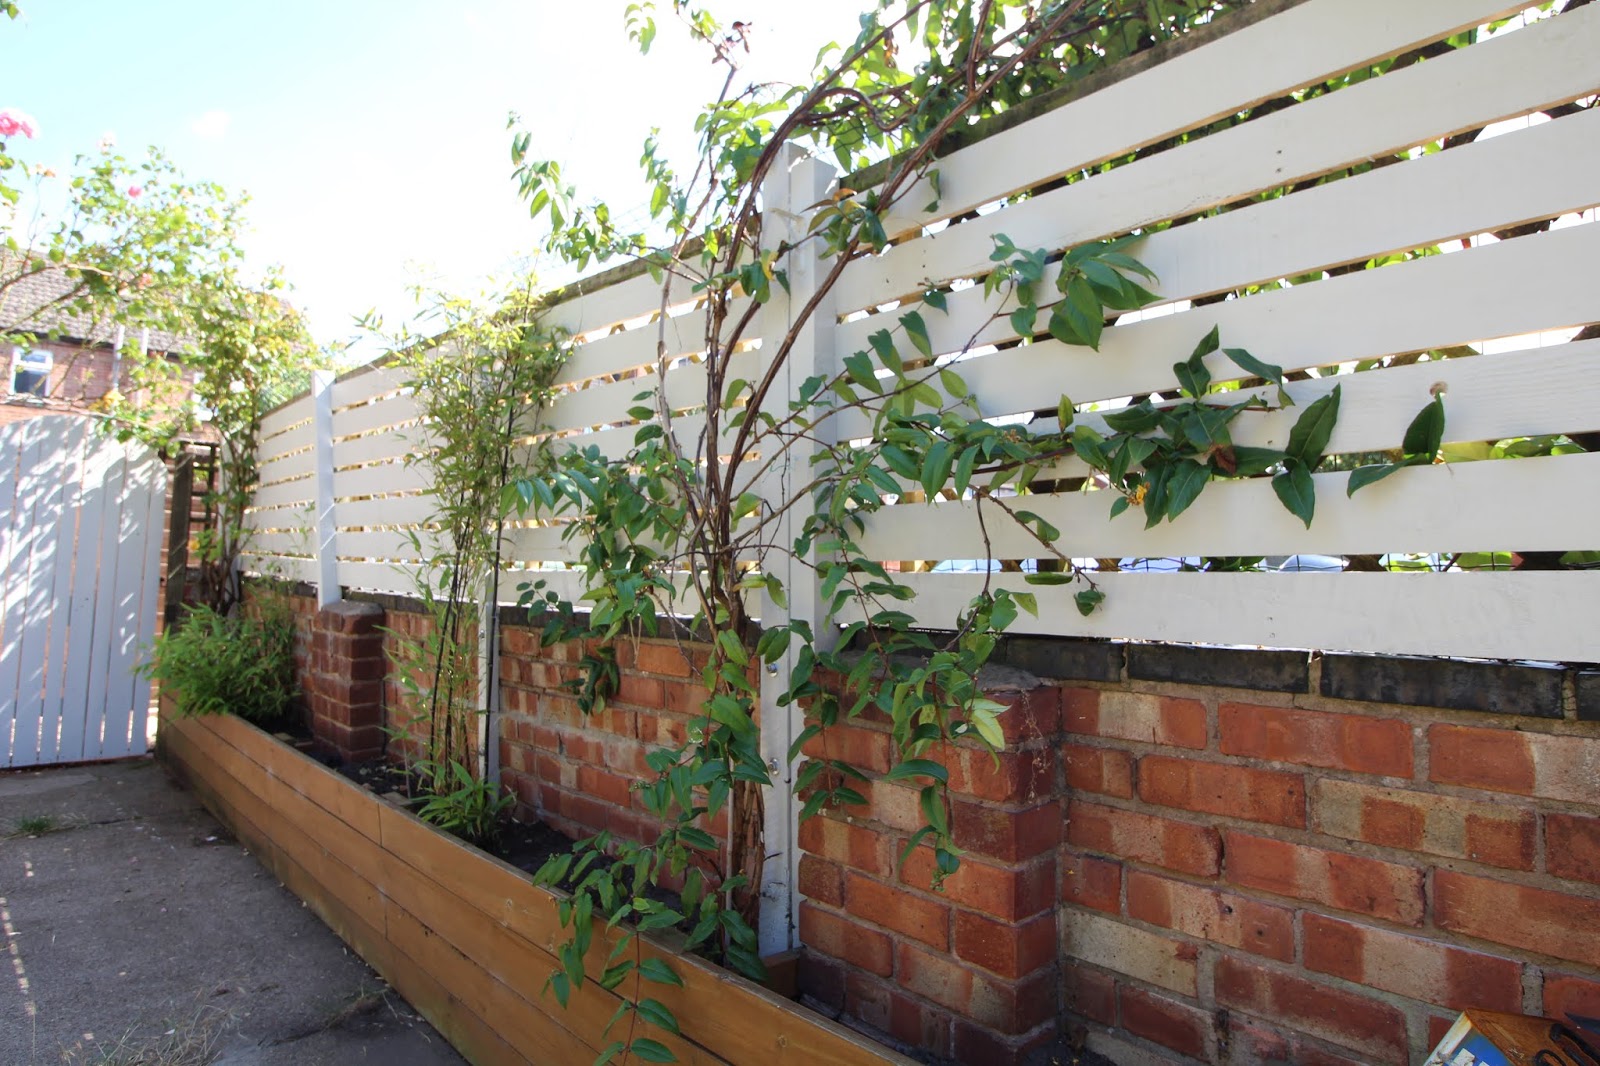
3 years ago I built a raised bed in the garden against the low-level brick wall between us and our neighbour. I built it with the intention of growing some climbing plants that would block out the view of the next-doors driveway (and the adjoining road) and give us a bit more privacy. Well, that didn't work out. Actually, I tell a lie - it did work out, but it worked too well. What I mean is, one of the climbers I had picked (a Solanum Crispum I believe) was on a mission to take over the world. It grew wilder than wild, quicker than the speed of light and basically became a nightmare to control and ended up being more of a pest than anything. So last year I dug it back up and decided I needed a new idea.
My new idea was pallet fencing. Three years ago I was totally against the idea of fencing - I don't know why? I think it's perhaps because I like the idea of continuity around the garden, and on the opposite wall we have some lovely large shrubs that act as privacy all on their own. I thought I could re-create the same effect on this side, but it turns out I couldn't. After our neighbours (on the shrubbed wall side) added additional fencing to some of the more sparse areas of foliage, the garden matched no more anyway and it gave me the perfect opportunity to put fencing up.
But, fences are expensive and because I like to save money, I decided to do something a bit different. Cue - pallet fencing! And of course, I'm going to show you how you can make your own and save a ton of ££ too!
You Will Need:
First things first, here's a quick look at what we were personally dealing with. We have low-level walls with a kind of trellis over the top (these were already here when we moved in!) which are attached to fence posts. After moving in, we added reed-screening for additional privacy, but that has since fallen down and it's now all looking a bit scruffy.
We'll be keeping the trellis in place to build on top of, but you definitely don't need one in order to complete this DIY.
So here's what we did....
// (adsbygoogle = window.adsbygoogle || []).push({}); // Step 1 - Affix New Posts
Whether you're adding fencing to the top of an existing wall (like us!) or not, you will need to have some fence posts in place, as this is how we'll be affixing the pallet planks in position. If you already have fence posts in place, you can skip this step altogether.
If you don't, and you also don't have a brick wall like ours, you will need to dig into the ground, pop the post in and secure it into position with postcrete. I don't have a blog post for that (yet) so you'll have to check out this video for help on that.
If you have a low-level brick wall like us - the good news is that you can just affix the posts onto that. We already have a fair few in place anyway as that's how our trellis has been installed, but we needed to replace a couple and we're also adding a few more to support the trellis even further. We're actually not taking the trellis down (seems a bit of waste?!), so we'll be fixing our pallet planks on top of it instead.

We used two methods to fix our new fence posts to the wall. One of them involved drilling a hole all the way through the wall, inserting a threaded rod, bolting it in place with nuts and bolts either side of the wall, and then cutting the excess off from the rod, which you would need an angle grinder to do. This is how our existing posts are attached, however for this method, you would need access to the other side of the wall. Don't worry though, I have an alternative method if this one isn't for you! But, here are some shots of how this process looks...


For the simpler, albeit it slightly more expensive method, we used concrete bolts. These are basically special bolts which screw straight into the brick, no wall plugs required. Simply drill a hole the same width as the bolt, straight through the fence post and into the wall, only going as deep as the bolt will sit. Then, screw the bolt in!


You'll need to use a ratchet to tighten the bolt into the brickwork, and voila, your fence posts will be full secure.

Literally, it's as easy as that. We're super impressed with these bolts and can't believe we haven't used them before! I would definitely recommend for any outside projects.
// (adsbygoogle = window.adsbygoogle || []).push({}); // Step 2 - Sourcing Pallet Wood
The two best places I've found for finding free pallet wood is Facebook Marketplace and Gumtree. While there are a fair few free pallets to be had, finding a bulk amount of pallets which are all the same size is much easier said than done. If you're aiming for a consistent finish on this project or any other, mismatched free pallets isn't always the best way to go.
In which case, bulk sellers may be a better option as they usually have a large quantity of the same stock. Despite having to pay for them, it can still work out much cheaper than buying wood new from a DIY store. And of course, this way you can at least guarantee the planks will be of the same size. We buy ours from a farm local to us (who also dismantles the pallets and sells the wood separately) for 70p a plank, of 2m length. It's relatively affordable, although yes, I'd prefer it to be free! ;)
Another way to get free pallets is asking smaller businesses if they have any pallets going spare or are willing to sell you some on the cheap. After all, if you don't ask - you don't get! Our local Jewsons often give away scrap pallets from time-to-time.

If you need to dismantle any pallets, I recommend this Roughneck Lifting Bar tool. It makes the job a lot easier, but don't expect the pallet to fall apart for you; you will still need to use a fair bit of elbow muscle. ?
For this fencing DIY, I recommend the longer and bigger pallets. As obviously, the longer the slats of wood are - the fewer fence posts you will need! The photo above isn't the actual pallets we used for this particular DIY.
Step 3 - Cut Pallet Wood to Size
So as I mentioned earlier, the pallet planks will be attached straight onto the fence post, so you'll need to cut your pallet wood to this size. Simply measure the distance between the centre of one post to the centre of the next post and cut the planks with a saw.

// (adsbygoogle = window.adsbygoogle || []).push({}); //
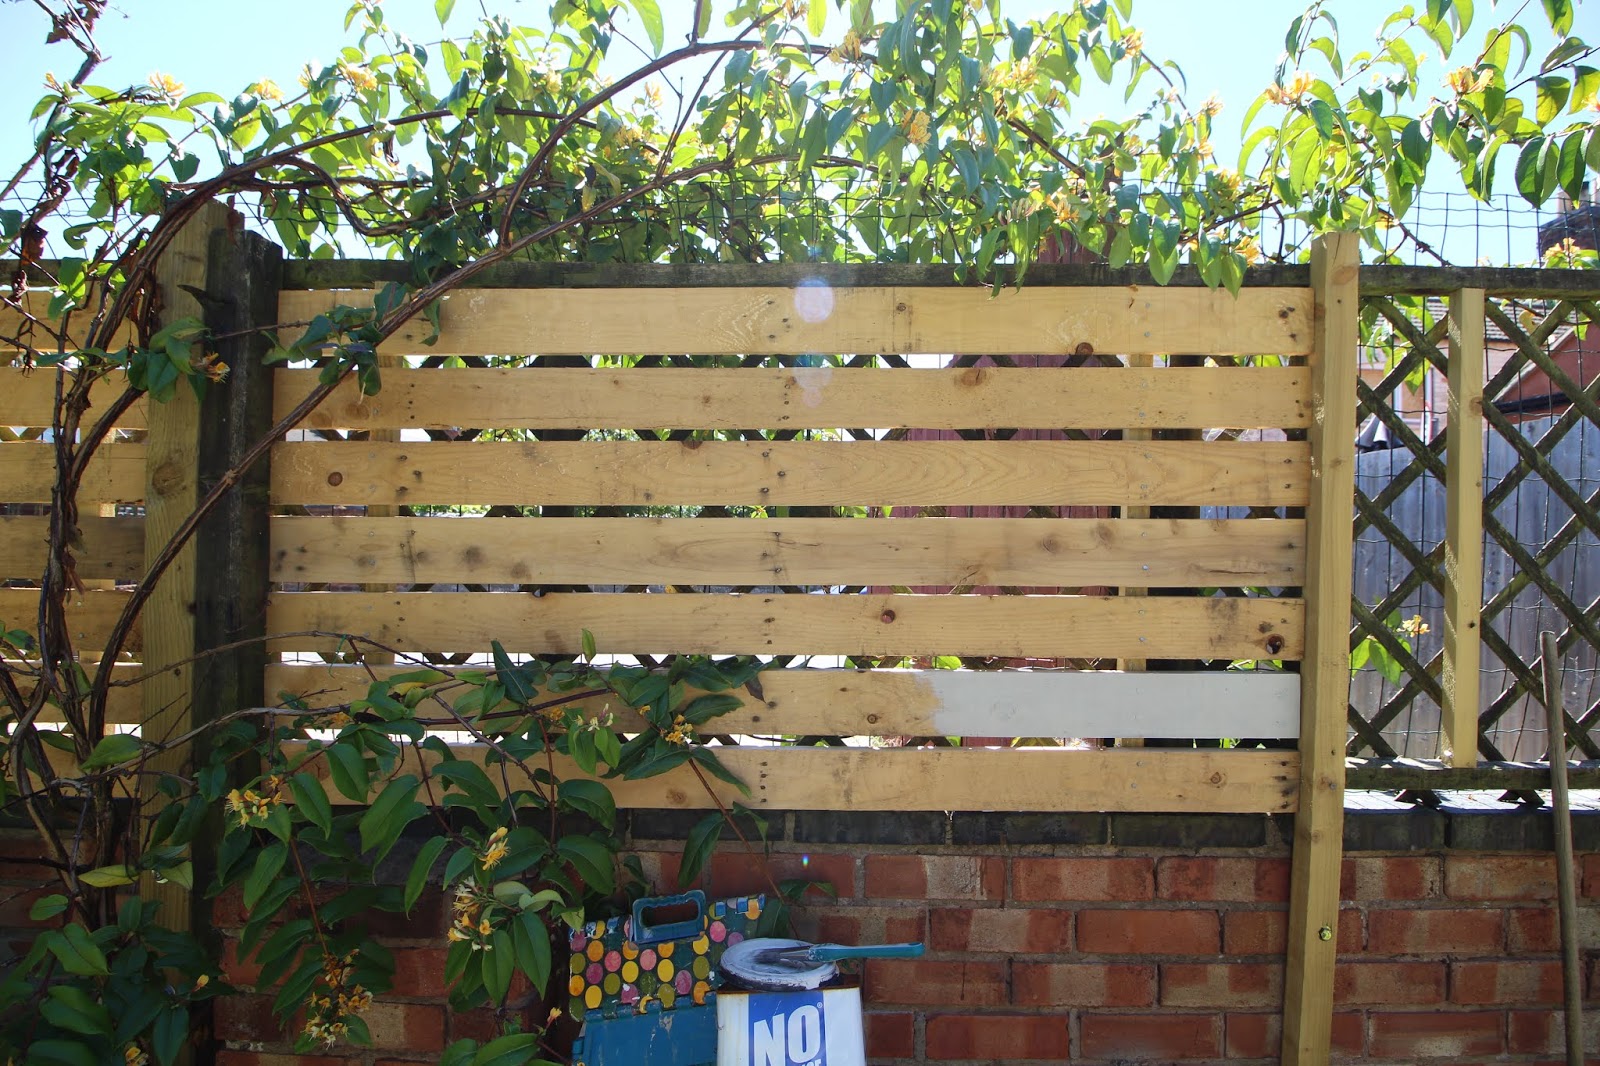
We're actually fitting ours to the frame of the trellis instead so ours will be recessed against the fence post. We've added additional lengths of timber to the inside of the trellis frame with screws, and our pallet planks will attach to these. Hard to explain, but this is ours..


Step 4 - Affix Pallet Planks
You'll want to use either galvanised nails or galvanised screws to attach the planks, as these won't rust. Personally, I prefer the look of nail heads, but the screws are definitely easier to deal with.
All you need to do is simply pop a couple of those into either end of the pallet plank, straight through into the fence post. You'll want to make sure your plank is level with a spirit-level as you do this (although we've actually done ours level with the brickwork, which ironically is not level) and it's really as easy as that.
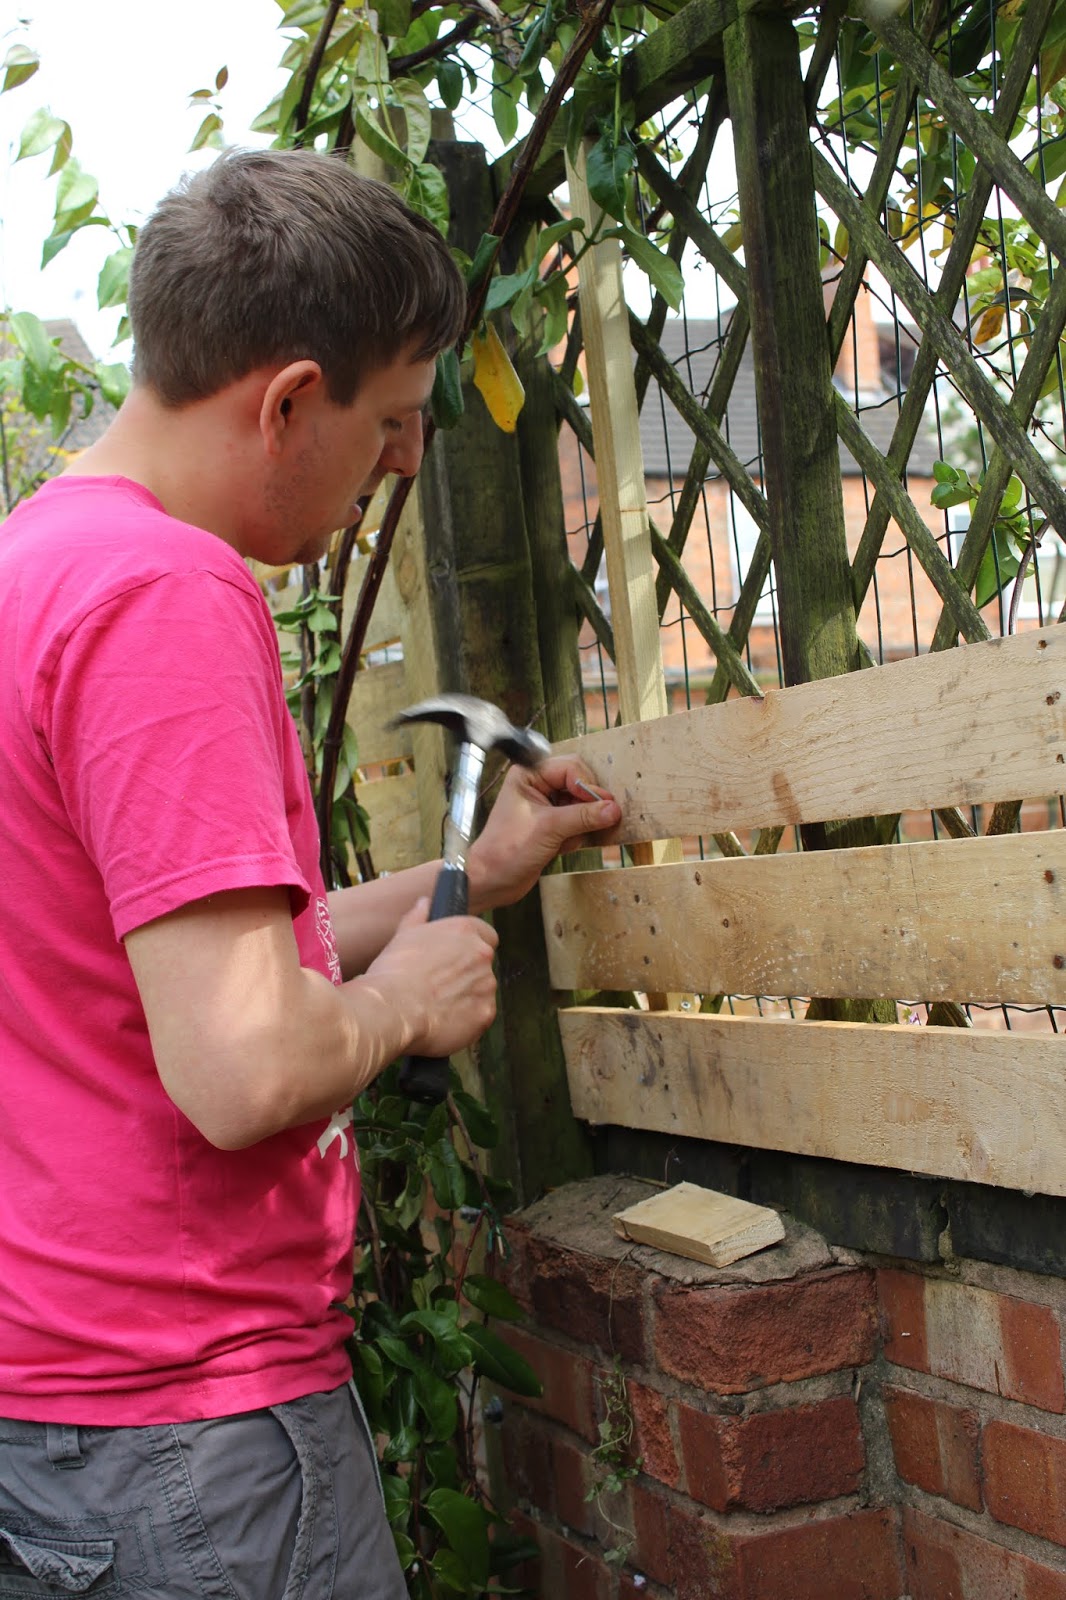
To space the pallet planks apart so that there's a gap between each of them, for the modern trendy look, you can just use an offcut of pallet wood to wedge between boards. This makes the gap a little over 1cm thick, which I think is perfect as it still gives you plenty of privacy.

Looking pretty good right?! You can see how we've used pallet wood of a consistent width for an even-look finish. You could use varying widths for a bit interest though, it's totally up to you.


// (adsbygoogle = window.adsbygoogle || []).push({}); // Step 5 - Paint or Stain
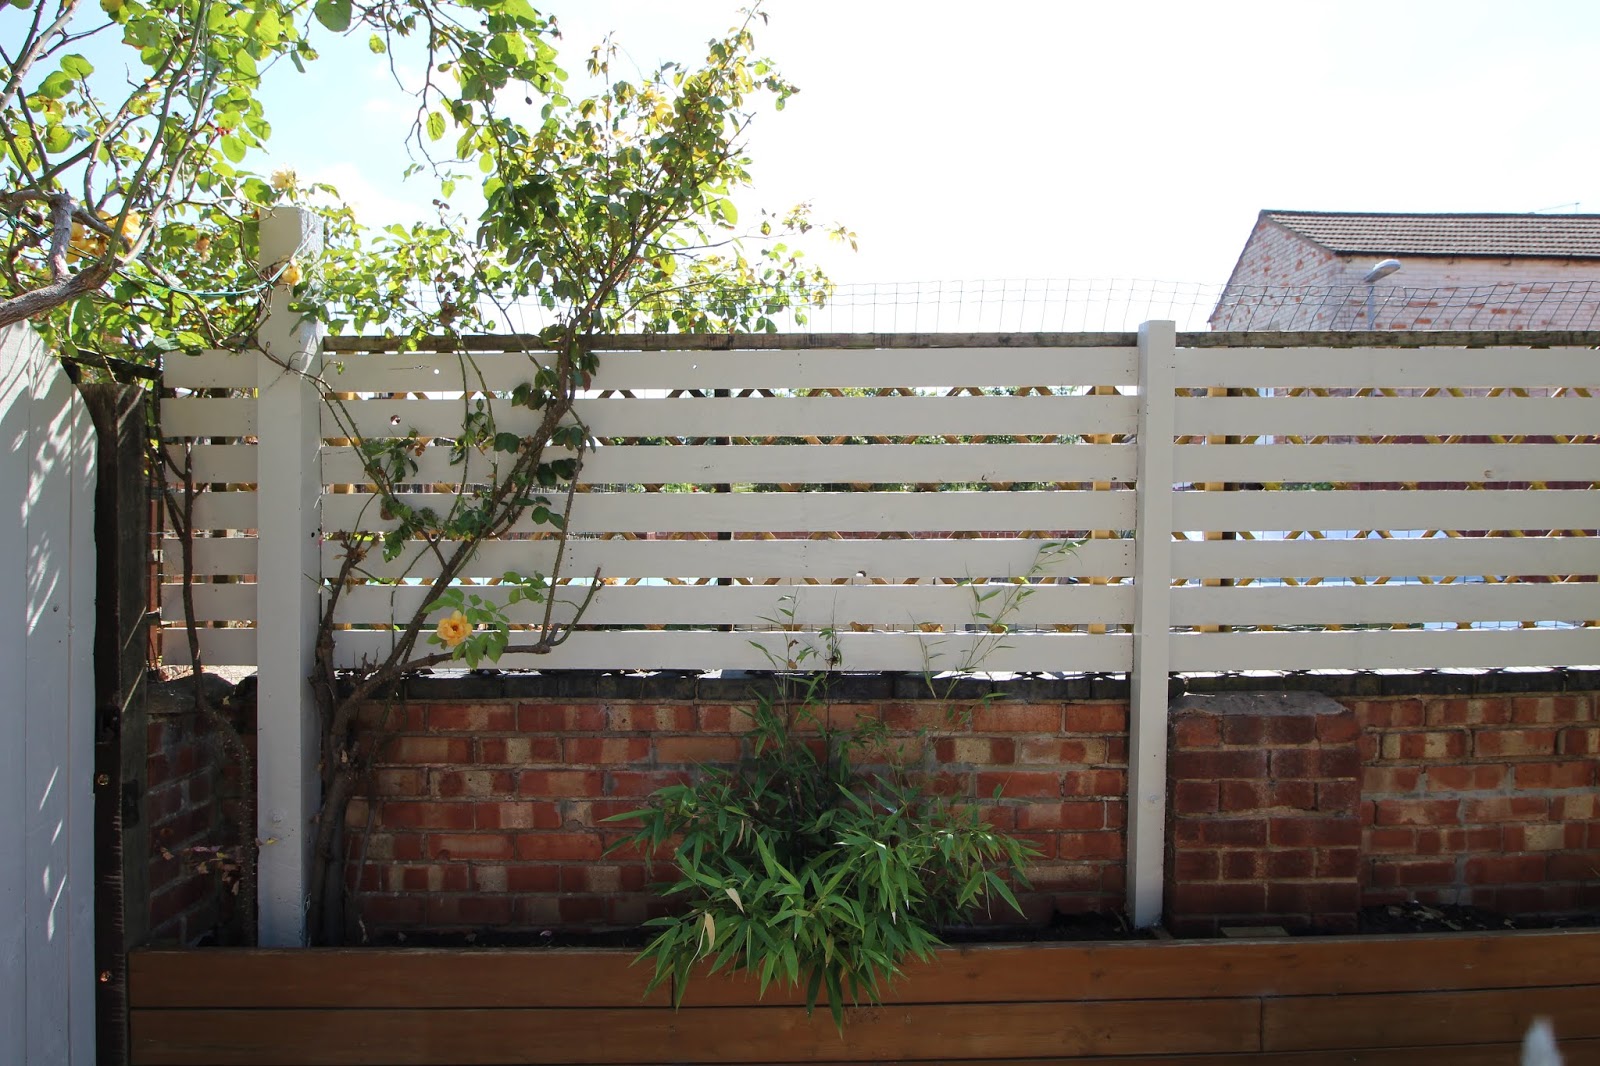
Pallet wood doesn't usually need treating for outdoor use, but our boards were quite dirty and mismatched in tone, so I wanted to paint ours. I've used Johnstone's Garden Colour Range in 'Calming Stone' which is a kind of off-white colour with a hint of grey. It's much whiter than I anticipated actually, but it's added a really lovely fresh modern feel to the garden - and it's nice to have some painted wood, considering we have quite a lot of stained wood in the garden too.
I'd never used Johnstone's paint before but I really really recommend it. The coverage was amazing, you only need one coat for most wood and one tin went reaaaally far. Nothing lCuprinolinol which is watering as hell (sorry cuprinol!) I would definitely buy this one as a favourite in the future - and it was only £13.50 from Homebase!


And there you have it - one new pallet slat fence! We'll probably be doing this all over again at the back of the garden behind the roses bushes too, but not until they've finished their flowering season (we're sadly going to need to cut them!) and when we have a bit more cash to play with. For now, though, we have full privacy in the garden and I'm loving it!


// (adsbygoogle = window.adsbygoogle || []).push({}); // And Incase You've forgotten what it looked like before. Here's a Before & After! 

Unless you have a trellis too, your slats will sit on-top of fence posts, so they should run almost seamlessly across the wall. Which is generally how most slat fences appear, and I think probably looks a bit better. We chose to do ours onto the trellis, mainly because our fence posts were of varying thicknesses - it just wouldn't have worked so well.
But, what do you reckon? A good alternative to real fencing? If you can stock up on free pallets - I think this DIY would be incredibly worthwhile for the amount of money you could save! And I think it looks pretty decent too. But obviously, I might be a tad biased ??
Total Costs
(rounded to the nearest pound)
New Tools Purchased:
None
Materials Used:
Fence Post & Treated Timber - £23
Masonry Bolts (10pack) - £8
Pallet Wood - £20
Nails - £5
Paint - £13
Total: £69
from http://www.kezzabeth.co.uk/2018/07/diy-slat-fence-with-pallet-wood.html |
 Working on old houses I hear all kinds of complaints about how “inefficient” they are and what energy hogs people used to be. In a time of alternative facts and fake news, it shouldn’t surprise me, but it still does bother me to see these old houses getting a bad rep when none is deserved.
 What if I told you that you could make your own DIY window screen in just one day? Would you believe me? Well, you should, because with this post and accompanying video, it’s very doable for just about any DIYer!
 If your house was built from 1965-1973, you may be one of the “lucky” folks with early aluminum wiring. Thanks to spiking copper prices in the 1960s, builders stared looking for less expensive materials to use for wiring houses and aluminum seemed to fit the bill.
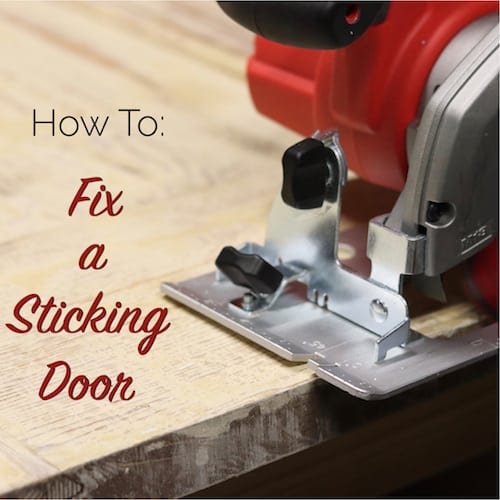 As the weather turns warmer, those old wood doors can start to swell and stick making it difficult to operate. In warmer, wetter weather, wood can swell more than you may think, causing doors that worked perfectly in the winter to suddenly become so swollen that they are inoperable.
 The results from year 4 of my wood filler and epoxy test are now ready! Four years ago I took five of the most popular and readily available wood patching products and applied them to the same piece of wood. I then set that piece of cypress out in my backyard and left it alone for the next four years to see how they held up.


 RSS Feed
